This is default featured slide 1 title

Go to Blogger edit html and find these sentences.Now replace these sentences with your own descriptions.This theme is Bloggerized by Lasantha Bandara - Premiumbloggertemplates.com.

This is default featured slide 2 title

Go to Blogger edit html and find these sentences.Now replace these sentences with your own descriptions.This theme is Bloggerized by Lasantha Bandara - Premiumbloggertemplates.com.

This is default featured slide 3 title

Go to Blogger edit html and find these sentences.Now replace these sentences with your own descriptions.This theme is Bloggerized by Lasantha Bandara - Premiumbloggertemplates.com.

This is default featured slide 4 title

Go to Blogger edit html and find these sentences.Now replace these sentences with your own descriptions.This theme is Bloggerized by Lasantha Bandara - Premiumbloggertemplates.com.

This is default featured slide 5 title

Go to Blogger edit html and find these sentences.Now replace these sentences with your own descriptions.This theme is Bloggerized by Lasantha Bandara - Premiumbloggertemplates.com.

lonethouts.blogspot.com

Saturday, January 28, 2017

HOW TO USE YOUR ANDROID PHONE AS CCTV CAMERA

Go to the play store and type ip camera
  and they can appear many application but you need to install two application only
1.Ip webcam
2.Home security ip cam


Tuesday, January 24, 2017

Create and Insert a Screen Shot into Word or PowerPoint

By pressing PRINT SCREEN button on your keyboard, you capture an image of your entire screen, also known as a "screen shot" or "screen capture", and it is copied to the Clipboard in your computer's memory. You can then paste the image into a document, e-mail message, or other file. If you want, you can print the image from the application that you pasted it into.

This technique becomes very helpful when you want to insert an image of a webpage into a PowerPoint presentation or a Word document.
You may be asking where the Print Screen button is on your keyboard. On notebook keyboards: look for a button to the right, above the F keys. On external keyboards: it may be above the arrow keys, near the Delete and Page Up buttons. The text you see on your keyboard might be PrtSc, PrtScn, or PrntScrn. The other text on the Print Screen key is usually SysRq.

Copy only the image of the active window

The active window is the window that you are currently working in. Only one window can be active at a time.
  1. Click the window that you want to copy
  2. Press ALT+PRINT SCREEN
  3. The text you see on your keyboard might be PrtSc, PrtScn, or PrntScrn The other text on the Print Screen key is usually SysRq
  4. Paste (CTRL+V) the image into a Microsoft Office program or other application

Copy the entire image on the screen

  1. Open everything you want copy and position it the way you want
  2. Press PRINT SCREEN
  3. The text you see on your keyboard might be PrtSc, PrtScn, or PrntScrn The other text on the Print Screen key is usually SysRq
  4. Paste (CTRL+V) the image into a Microsoft Office program or other application
Once you get the image or screen shot into your Microsoft Word or PowerPoint program, then you are able to edit the image by using the Format tab on the Picture Tools Contextual tab. From this tab, you can adjust the brightness or contrast; change the style; position the image within your document; and change the size or crop it.
You can also Microsoft Paint (Start, All Programs, Accessories, Paint) to crop the image, or save it as a JPEG file.

Use Paint to crop your capture image and save as JPEG

  1. Capture the screen
  2. Click on the Start button, slide up to All Programs, then slide up to Accessories, and finally slide over and down to Paint
  3. Press Ctrl + V to paste in the picture Note: If you want just a portion of the image you can use the Select tool to grab just a portion of the screen
  4. Click the Freeform Select tool. Then click the Select tool again. Use the Select Tool to select what you need
  5. Press Ctrl + X to cut what you need
  6. From the File menu choose New
  7. Click No when asked to Save
  8. Press Ctrl + V to paste in the new picture
  9. You can continue to edit this size
  10. When ready, select and copy and paste into Word (You can also go to the File menu and choose Save As)
  11. If this picture is for the web, in the Save as type box, choose JPEG
  12. Add a name and save to your computer

Export PDFs to Microsoft Office formats

Step 1 of 5

Open the PDF file 

Start Acrobat, and open the PDF file you want to export. If you opened it recently, select it from the list of recent files in the Acrobat Home screen. Otherwise, click My Computer under Storage, navigate to the PDF file, and choose Open.
If you’re using our sample assets, select the Summary.pdf file to export to Word, Analysis.pdf file to export to Excel, or Overview.pdf file to export to PowerPoint.
Note: Some PDF files have security settings that prevent exporting and editing. If you created the PDF file, you should be able to change or remove any restrictive security settings.
open pdf files
Step 2 of 5

Use the Export PDF tool

Click Export PDF in the Tools panel. Then choose a format, and click Export.
  • To export to a Word document, click Microsoft Word, and then select either Word Document (.docx format) or Word 97-2003 Document (.doc format).
  • To export to an Excel document, click Spreadsheet, and then select either Microsoft Excel Workbook (.xlsx format) or XML Spreadsheet 2003 (.xml format).
  • To export to a PowerPoint presentation, click Microsoft PowerPoint.
Tip: You can use the Export PDF tool to export images, HTML documents, and other formats as well.
export pdf tool
Step 3 of 5

Customize conversion settings

If you want to specify settings for the exported document, click the Settings icon next to the document type, change the settings, and then click OK.
customize conversion
Step 4 of 5

Export the file

Select a folder for the exported file, or click Choose a Different Folder and navigate to the appropriate folder. Name your document, and click Save.
Tip: Select Open file after export in the Export dialog box if you want to work with the file immediately.
Export the file
Step 5 of 5

Get to work in Office

Open the document in Word, Excel, or PowerPoint, if it’s not already open. Your document is live in the native Office format, so you can edit text, images, and other data just as you can in any other Office document.
edit in Office

Can I recover lost data from the internal memory of an Android Smartphone or an Android Tablet?

It is possible to recover lost or deleted files from the internal storage of an Android mobile device assuming the phone or tablet is operational and you can set it in to Debugging mode.
Here's how:
  1. You need to change the Android settings on the phone or tablet.
    Go to: Settings > Applications > Development > USB Debugging, and turn it on. (Options may vary slightly based on device and Android version.)
  2. Connect your phone/tablet to your PC via a USB cable.
    Then, on the device, pull down the status bar and select USB connected.
    A screen will appear in which you need to select the button which reads
    Connect storage to PC.
    If you do not see this option, reconnect the USB cable and try again.
    Windows will load drivers for the device which may take a minute, after which, it will be detected as Removable memory with an assigned drive letter.
  3. You can now launch Active@ File Recovery software. The storage media will be recognized as another drive on your system which you can scan for lost or deleted files.
NOTE: When recovery is complete, the device should be safely removed from Windows (Safely Remove Hardware and Eject Media) and USB Debugging mode should be turned OFF on the phone.
This procedure will work with most devices (Samsung, LG, HTC, Motorola, Asus, etc. ) running Android versions - 2.x, 3.x, 4.0.x (Eclair, Froyo, Gingerbread, Honeycomb, Ice Cream Sandwich). UMS (USB Mass Storage) option is not available in v4.1, 4.2 Jelly Bean.

Some References:

How to Enable USB Debugging on Samsung Devices Android versions - Gingerbread, Honey Comb and Jelly Bean (v2.3, v3.x and v4.x, respectively):
more info here and here.
Further research shows that other Android devices such as LG, HTC, Motorola, Asus, etc… also can be set to use USB Debugging mode so they can be scanned to recover data.
We tested this with Samsung Galaxy S.
Data recovery software for android A Super Scan with File Recovery revealed a FAT32 partition with files/folders - photos/videos.
Data recovery software for android
By:@lonethouts

Saturday, January 7, 2017

How to Automatically Shut Down Your Computer at a Specified Time

Do you always forget to switch off your computer before going to bed, or just forget to look at the clock while you're working? This article will tell you how to get your computer to shut down at a time specified by you.

1
Using the Task Scheduler

  1. Image titled Automatically Shut Down Your Computer at a Specified Time Step 1
    1
    Open the Task Scheduler. This option is available in Windows 7 and Windows 8. In Windows 7, click Start → Control Panel → System and Security → Administrative Tools → Task Scheduler. In Windows 8, press the Win key, type "schedule tasks", and select "Schedule tasks" from the search results.
  2. Image titled Automatically Shut Down Your Computer at a Specified Time Step 2
    2
    Click "Create Basic Task". This option is available in the Actions menu on the right side of the window. You will need to give the task a name and description. Name it something easy to remember, such as "Shutdown Timer". Click Next > to continue.
  3. Image titled Automatically Shut Down Your Computer at a Specified Time Step 3
    3
    Choose the frequency. Select the "Daily" option on the "Task Trigger" page and click Next >. Choose the time you want your computer to shut down each night. Leave the "Recur ever: X days" setting to "1". Click Next >.
  4. Image titled Automatically Shut Down Your Computer at a Specified Time Step 4
    4
    Choose "Start a program". This option will be on the "Action" screen and should be automatically selected. Click the Next > button to proceed.
  5. Image titled Automatically Shut Down Your Computer at a Specified Time Step 5
    5
    Enter the location for the shutdown program. When Windows shuts down, it actually runs a shutdown program. In the "Program/script" field, type C:\Windows\System32\shutdown.exe.
    • In the "Arguments" filed, type /s. Click Next >.
  6. Image titled Automatically Shut Down Your Computer at a Specified Time Step 6
    6
    Review your settings. In the Summary screen, review your settings to make sure that you have selected the correct day. Click the Finish button to save the task. Your computer will now shut down at that specified time each day.[1]

2
Creating a BAT File

  1. Image titled Automatically Shut Down Your Computer at a Specified Time Step 7
    1
    Open notepad by going to Start> All Programmes> Accessories> Notepad. Or, you can just type "notepad", without quotes, into the start menu and hit enter.
  2. Image titled Automatically Shut Down Your Computer at a Specified Time Step 8
    2
    Copy the following code:
    • @echo off
    •  :W
    • if %time%==00:00:00.00 goto :X
    • goto :W
    •  :X
    • shutdown.exe /s /f /t 60 /c "Go to bed!!!!!!"
      • This constantly checks the time to see if it is midnight and, if it is, it shuts down the computer with the message "Go to bed!!!!"
  3. Image titled Automatically Shut Down Your Computer at a Specified Time Step 9
    3
    Change the if %time%== part to a time of your choice. It must be in this format: HH:MM:SS.MS and in 24 hr format otherwise it won't work.
  4. Image titled Automatically Shut Down Your Computer at a Specified Time Step 10
    4
    Go to File> Save As.
    • Change the "Save as type" box to "All Files"
    • Type "timer.bat" into file name and click "Save"
  5. Image titled Automatically Shut Down Your Computer at a Specified Time Step 11
    5
    Double click the file. A blank command prompt screen should appear.
  6. Image titled Automatically Shut Down Your Computer at a Specified Time Step 12
    6
    Leave this window open while you do your work.
  7. Image titled Automatically Shut Down Your Computer at a Specified Time Step 13
    7
    When the time you specified in step 3 comes around, your computer should display a message for one minute, then shut down.
  8. Image titled Automatically Shut Down Your Computer at a Specified Time Step 14
    8
    If you wish to abort the shutdown, press the Windows Key (the key with the Microsoft logo on it) + R.
  9. Image titled Automatically Shut Down Your Computer at a Specified Time Step 15
    9
    Type "shutdown -a", without quotes into the window that appears and hit Enter. A Command Prompt window should appear, then disappear. A balloon similar to this one should appear.

Tuesday, January 3, 2017

How to flash Samsung Stock/Official ROM via Odin

After rooting with Kingo Android Root...

Your Samsung device may experience following "symptoms":
  • Device status will become "Custom/Modified", instead of "Official";
    • Go to Settings > About device > Status > Device Status > Custom
    • Boot into download mode and find out system status is Custom
  • Cannot receive OTA update.
And you may wonder...
  • How to restore phone status from "Custom/Modified" to "Official"?
  • How to receive OTA update after rooting?
There is one direct and most effective solution for both - that is to flash the Stock/Official ROM (original firmware) via specific tools.
This tutorial can also be followed to...
  • Restore your firmware when your device is soft-bricked;
  • In the event you think your stock ROM is faulty;
  • Flash back to a previous version on your Samsung device.

Flash Samsung Stock ROM (Official/Original Firmware) via Odin

Step 1: Download and install device driver software on your computer.
If you have used Kingo android Root already, skip this step. Otherwise, do it manually. Following are ways to do this...
  • Visit Samsung official website to find the correspondent driver software.
  • Google the driver software of your device. Download and then install it on you computer.
  • Download or update Kies, part of which will install or update drivers.
Once drivers are installed or updated, it is highly recommended that you restart your computer.
Step 2: Download and extract the Stock ROM (Official/Original Firmware).
SamMobilemay be the best choice to download stock firmware of Samsung device. Or you can go to Samsung Updates, XDA Forum or Google to find the correspondent firmware of your device. Samung Stock Firmware Download on SamMobile
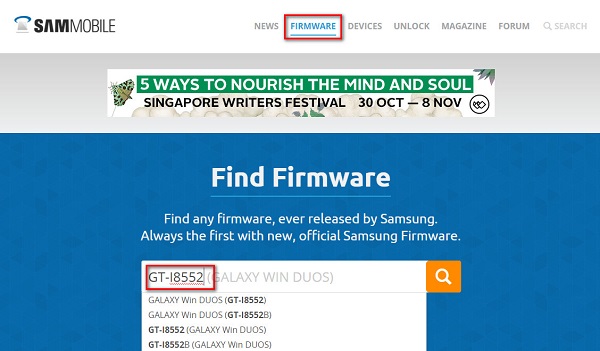
Click "Firmware" and enter your device model
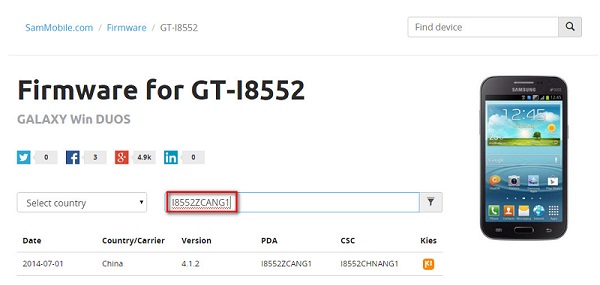
GT-I8552 Stock Firmware Download on SamMobile
Select country or type in certain info to filter, eg.Baseband version.
After downloading it (normally a compressed file), you need to extact/unzip it to certain location of your PC. The file types that Odin uses are *.bin,*.tar and *.tar.md5.
GT-I8552 Stock firmware downloaded from SamMobile
Find the file you have downloaded and then unzip it to Desktop.
Unzip GT-I8552 Stock firmware downloaded from SamMobile
You will find a *.md5 file after extracting.
Step 3: Download and extract Odin on you PC.
You can download Odin V3.10.7 directly from SamMobile. AndroidMTK is a fine alternative, it also offers a detailed list of Odin versions and download link. Or you can always Google "Odin download".    After downloading it on your PC, extract it to Desktop or another location you'd prefer.Odin v3.10.7 downloaded from SamMobile
Odin v3.10.7 zip file.
After extracting, right-click to "Open as Administrator". It may prevent certain issue from happening.
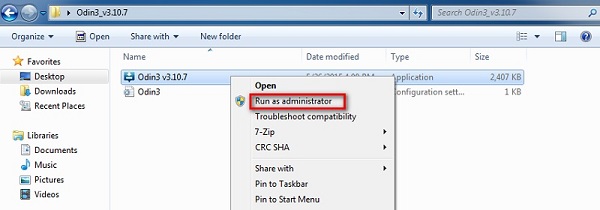
Run Odin v3.10.7 as adminitrator
Run Odin as administartor is recommended.
Step 4: Boot your Samsung device into Download mode.
Follow these steps to enter Download Mode/Odin Mode
  1. Power off your device
  2. Press and hold Volume Down key, Home Key and Power Key
  3. When your device vibrates, release Power key while keep holding the Volume Down key and Home key
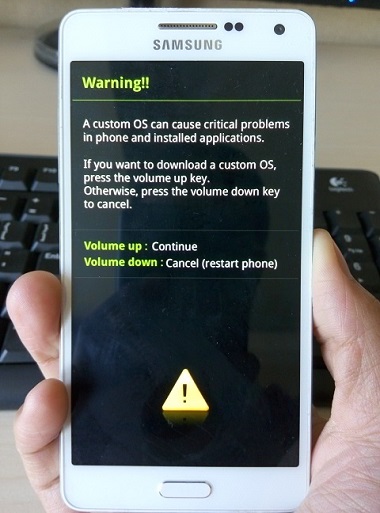
  4. Boot into download mode
    Warning before entering into download mode
  5. Press Volume Up key to enter Download mode, which has a green robot figure and “Downloading… Do not turn off target!!)
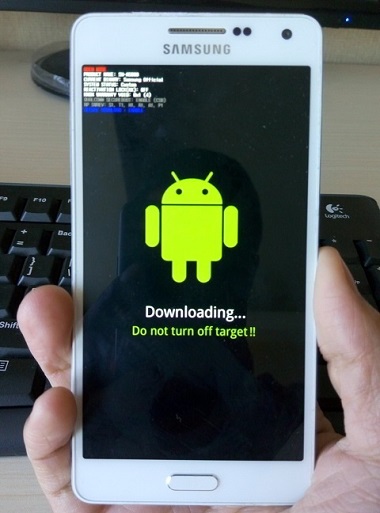
  6. Boot into download mode
    Now you are in download mode.
Step 5: Connect your device to PC.
You device should be automatically recognized by Odin. At the lower-left of Odin interface, it should show a message that says "Added!" and in the meantime you should see a light-blue box at the ID:COM section stating "COM:3" (the number depend on which USB port you have plugged the device cable and is irrelevant).
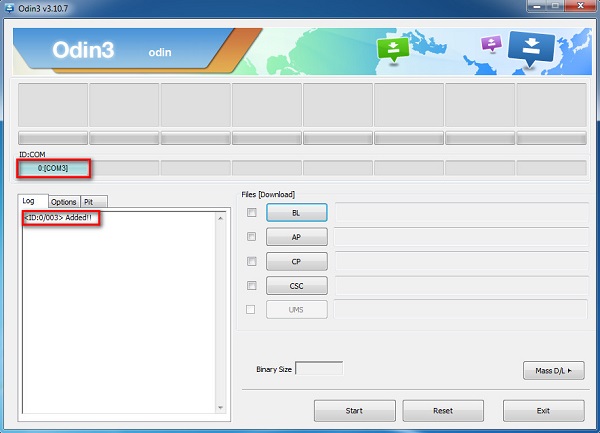
Connect device to Odin
Device is connected to Odin.
Step 6: Click "PDA" or "AP" to add tar.md5 file that you have extracted and then "Start".
Whether it is "PDA" or "AP" depends on the version of Odin that you used. But the md5 file goes to either "PDA" or "AP".
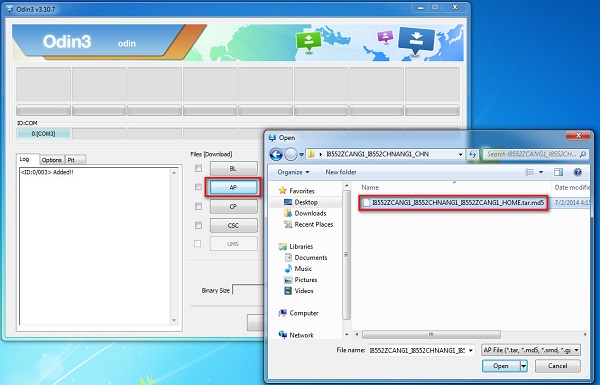
Add md5 file to Odin
Add *.md5 to Odin.
After adding the file, click "Start" to begin the flashing process.
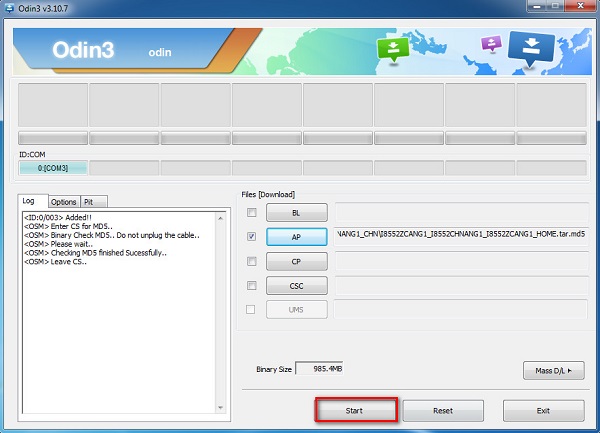
Click start to flash stock rom
Click "Start" to flash.
WARNING DO NOT REMOVE OR OPERATE ON YOUR DEVICE UNTIL FINISHED OR FAILED IS SHOWED ON ODIN.
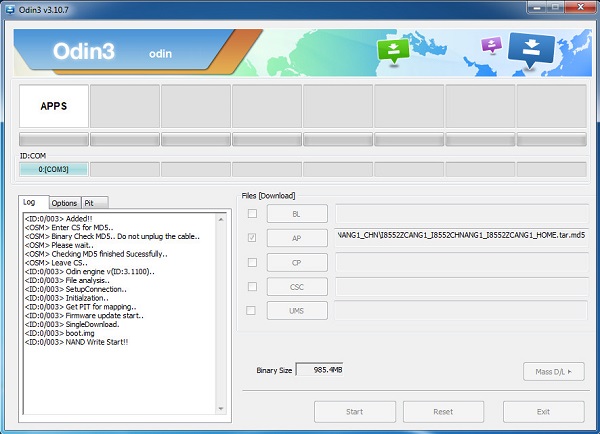
Starting to flash stock rom via Odin
Ongoing flashing process. Do not remove your device.
When the flashing process is done and if everything goes well, you should see a big green box saying "RESET" or "PASSED" (depends on the version of Odin is used). By now, the device should be rebooted and it is safe to remove/unplug your device.
Succeed to flash stock rom via Odin
Flash succeeded.

Top 4 Free Windows 10 Password Recovery/Reset Tool


“I get locked out of my Windows 10 computer. And I know some password recovery tools can find the password. Here I want to know if there are some free Windows 10 password reset tools. Waiting for your solution.”
Forgetting the newly created login password for your Windows 10 computer can be depressing. But there is no need to be too desperate since you can easily get some free Windows 10 password recovery tools here. Each of them can be effective to get your computer accessed. However, some of them have some requirements and incomparable disadvantages. Just figure out your situation and choose the best one to perform.

Top 1: With Created Password Reset Disk

Microsoft allows its users to create a password reset disk at the very beginning of setting the login password. This is Windows 10 password reset disk. Once you forgot Windows 10 password, you can insert this reset disk to reset the login password. It's considered as the best free Windows 10 password reset tool. However, if you haven't created this disk before, skip this method.
  • Step 1: Insert the reset disk into your Windows 10. After entering the wrong password, the “Reset Password” will appear, click it.
  • Step 2: Follow the instruction in “Password Rest Wizard” to reset the forgotten Windows 10 password.

    free windows 10 password recovery

Top 2: With Other Admin Account

If you have shared your Windows 10 with other user who has another admin account, you can enter the PC with this account and recover the forgotten password. However, this option will make you lose any e-mail messages or encrypted files on that account permanently.
  • Step 1: Open Control Panel after clicking Start button.
  • Step 2: Open “User Accounts”, then click User Accounts and Family Safety -> User Accounts.
  • Step 3: Click the Manage another account link. All the other users on this computer will be listed.

    free windows 10 reset
  • Step 4: Select the account whose password you want to recover. Then click “Change the password”.

Top 3: Use Free Windows 10 Password Reset Tool

A free password recovery tool for Windows 10 can easily recover lost or forgotten Windows 10 password. There are so many freeWindows 10 password removal tools on the market. Instead of try them one by one, I recommend Windows Password Key which is trustworthy by many users. It can easily recover Windows 10 administrator password (user password as well) and fully support various brands of desktops, laptops including Dell, HP, IBM, Sony, Lenovo, ASU, etc.
After downloading this tool, install and run it on any workable computer. Then get the detailed guide on how to perform this free password recovery tool. Moreover, it can easily crack Microsoft account password.
free windows 10 password removal

Top 4: Reinstall Windows 10

Actually reinstallation of Windows 10 must be the last choice for you to crack forgotten Windows 10 password, but it works! If you don't want to try because it will erase the files and folders on your hard drive, skip this and give a new consideration of free downloading Windows password recovery tool.

Sum up, there are 3 tools introduced for you to recover Windows 10 password for free. Still, a highly recommended Windows 10 password reset tool is included. Just choose the best for you to crack the forgotten one.