This document describes how to use the Cisco Configuration
Professional (Cisco CP) in order to set the basic configuration of the
router. Basic configuration of the router includes configuration of the
IP address, default routing, static and dynamic routing, static and
dynamic NATing, host name, banner, secret password, user accounts, and
other options. Cisco CP allows you to configure your router in several
network environments, such as small office home office (SOHO), branch
office (BO), regional office, and central site or Enterprise
headquarters, with an easy-to-use web-based management interface.
For more information about Cisco Configuration Professional, refer to
Cisco Configuration Professional Quick Start Guide.
The information in this document is based on these software and hardware versions:
- Cisco 2811 Router with Cisco IOS® Software Release 12.4(9)
- Cisco CP Version 2.5
The information in this document was created from the devices in a
specific lab environment. All of the devices used in this document
started with a cleared (default) configuration. If your network is live,
make sure that you understand the potential impact of any command.
Perform these steps in order to install CCP:
- Download Cisco CP V2.5 from the Cisco Software Center (registered customers only) and install it on your local PC.
The latest version of Cisco CP can be found at the CCP website.
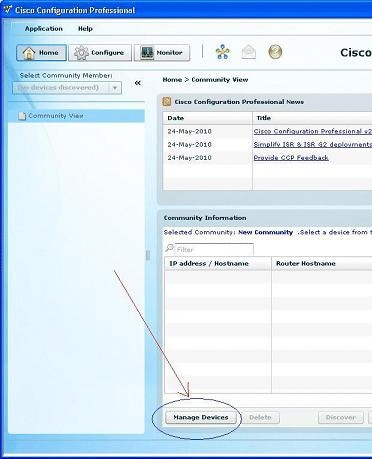
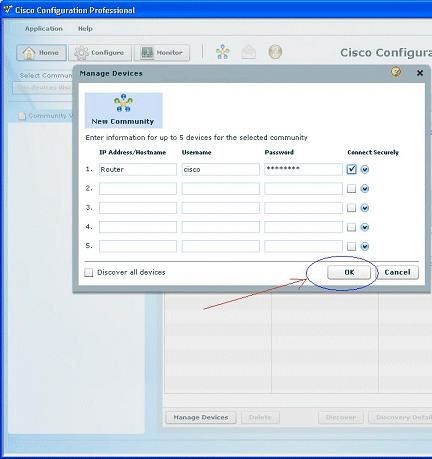
- Launch Cisco CP from your local PC through Start > Programs > Cisco Configuration Professional and choose the Community which has the router you want to configure.


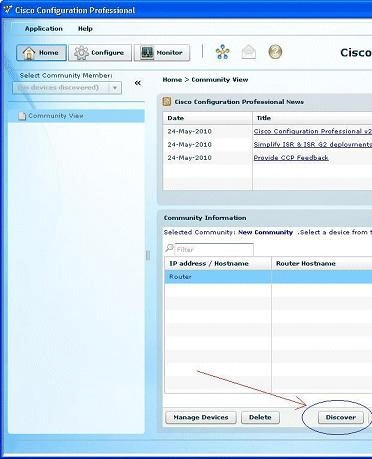
- In order to discover the device you want to configure, highlight the router and click the Discover button.

Note: For information on the Cisco router models and IOS releases that are compatible to CCPv2.5, refer to the
Compatible Cisco IOS releases section.
Note: For information on the PC requirements that runs CCPv2.5, refer to
System Requirements section
Perform these configuration steps in order to run Cisco CP on a Cisco router:
- Connect to your router using Telnet, SSH, or through the console.
Enter global configuration mode using this command:
Router(config)#enable
Router(config)#
- If HTTP and HTTPS are enabled and configured to use
nonstandard port numbers, you can skip this step and simply use the port
number already configured.
Enable the router HTTP or HTTPS server using these Cisco IOS Software commands:
Router(config)# ip http server
Router(config)# ip http secure-server
Router(config)# ip http authentication local
- Create a user with privilege level 15:
Router(config)# username <username> privilege 15 password 0 <password>
Note: Replace <username> and <password> with the username and password that you want to configure. Do not use the same password for your user and enable passwords.
- Configure SSH and Telnet for local login and privilege level 15.
Router(config)# line vty 0 4
Router(config-line)# privilege level 15
Router(config-line)# login local
Router(config-line)# transport input telnet
Router(config-line)# transport input telnet ssh
Router(config-line)# exit
- (Optional) Enable local logging to support the log monitoring function:
Router(config)# logging buffered 51200 warning
This document assumes that the Cisco router is fully operational
and configured to allow the Cisco CP to make configuration changes.
For complete information on how to start using the Cisco CP, refer to
Getting Started with Cisco Configuration Professional.
Refer to the
Cisco Technical Tips Conventions for more information on document conventions.
In this section, you are presented with the information to configure the basic settings for a router in a network.
Note: Use the
Command Lookup Tool (
registered customers only) to obtain more information on the commands used in this section.
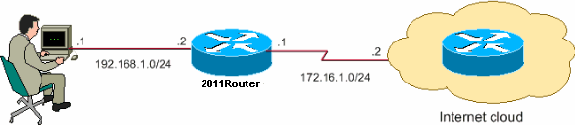
This document uses this network setup:
 Note:
Note: The IP addressing schemes used in this configuration are not legally routable on the Internet. They are
RFC 1918 
addresses which have been used in a lab environment.
Perform these steps in order to configure the interfaces of a Cisco router:
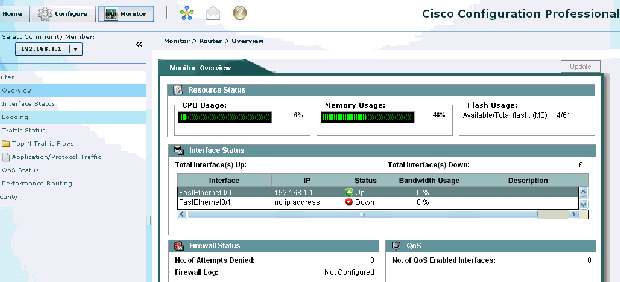
- Click Home in order to go to the Cisco CP homepage.
The
Cisco CP homepage provides information such as the hardware and
software of the router, feature availability, and a configuration
summary.

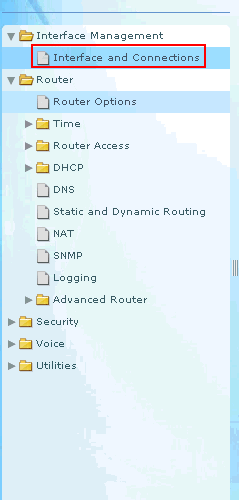
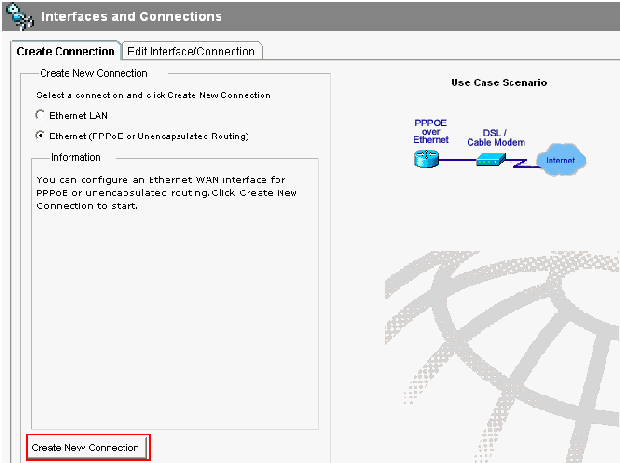
- Choose Configure > Interface Management > Interfaces and Connections > Create Connection in order to configure the WAN connection for the interface.
As an example, for FastEthernet 0/1, choose the Ethernet option and click Create New Connection.
Note: For other types of interfaces like Ethernet, choose the respective interface type and click Create New Connection to proceed.


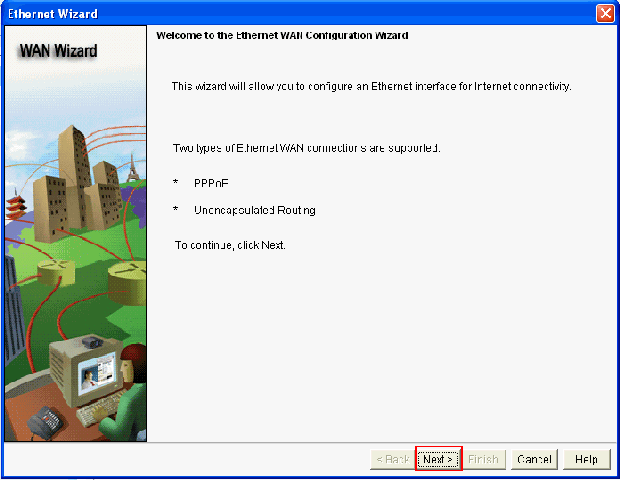
- Click Next in order to proceed once this interface appears:

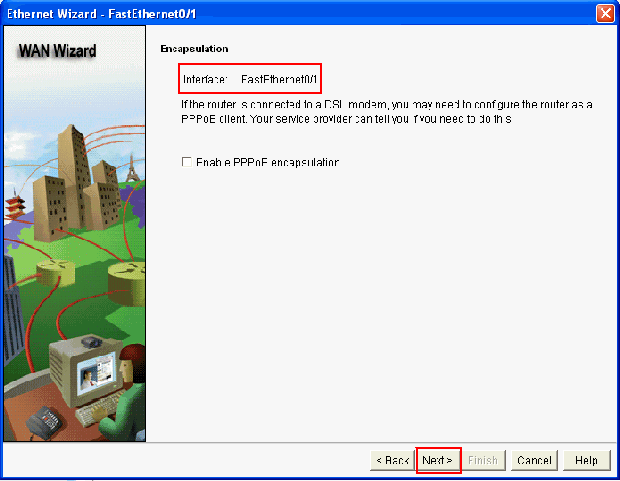
- Choose FastEthernet 0/1 (desired) from the Available Interfaces option and click Next.

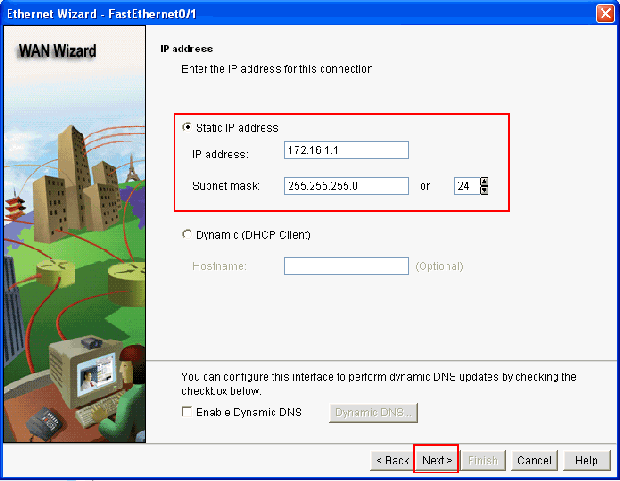
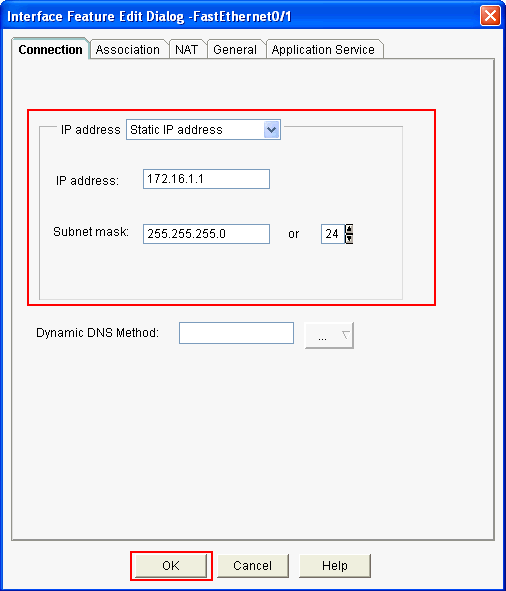
- Specify the static IP address with the corresponding subnet mask for the interface and click Next.

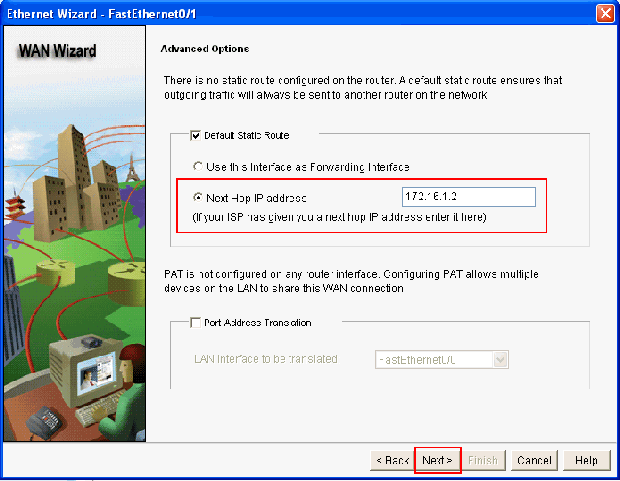
- Configure the default routing with optional parameters such
as the next hop IP address (172.16.1.2 as per network diagram) supplied
by the ISP and click Next.

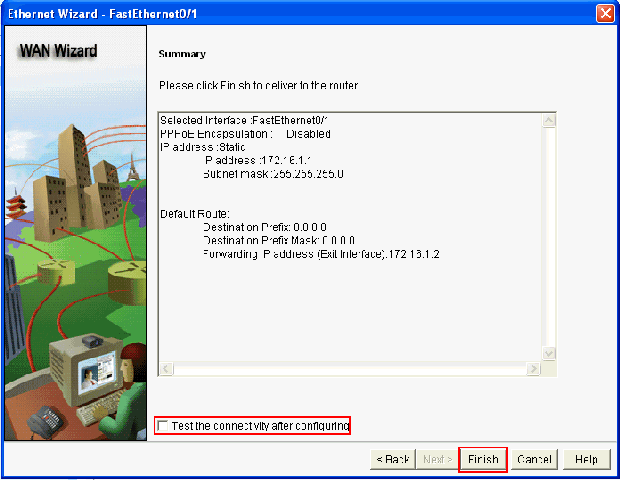
This window appears and shows the configuration summary configured by the user. Click Finish.
Note: The connectivity of the configuration can be checked by checking the checkbox next to Test the connectivity after configuring. This is an optional feature available.

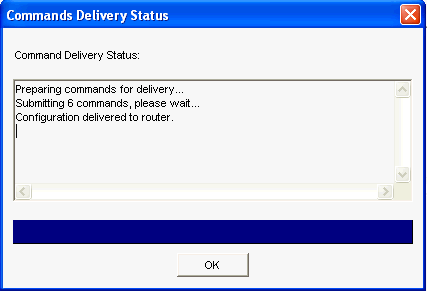
This
window appears and shows the command delivery status to the router.
Otherwise, it displays errors if the command delivery fails due to
incompatible commands or unsupported features.

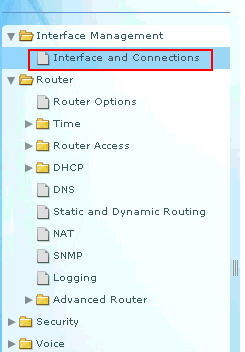
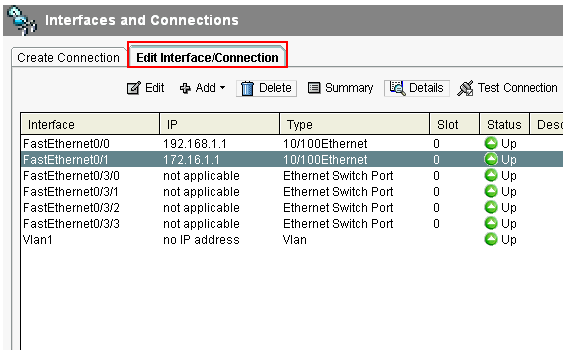
- Choose Configure > Interface Management > Interfaces and Connections > Edit Interfaces/Connections in order to add/edit/delete the various interfaces.


Highlight the interface with which you want to make changes and click Edit if you want to edit or change the interface configuration. Here, you can change the existing static IP address.

Perform these steps in order to configure the dynamic NAT in a Cisco router:
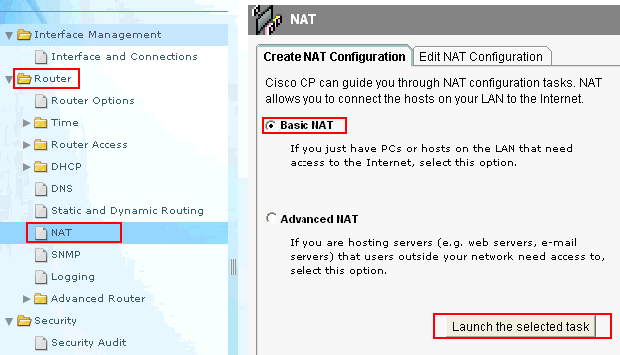
- Choose Configure > Router > NAT > Basic NAT and click Launch the selected task in order to configure basic NATing.

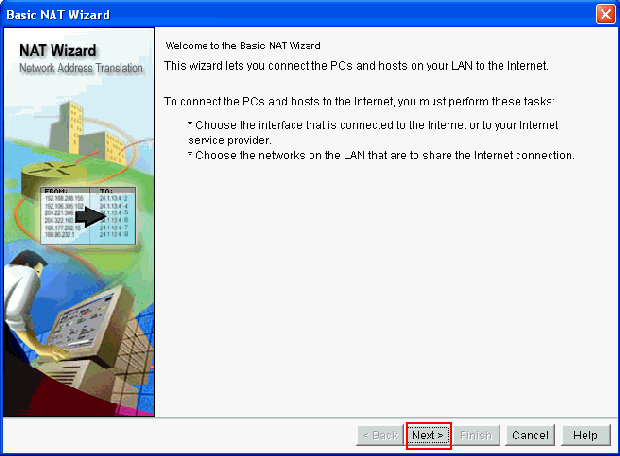
- Click Next.

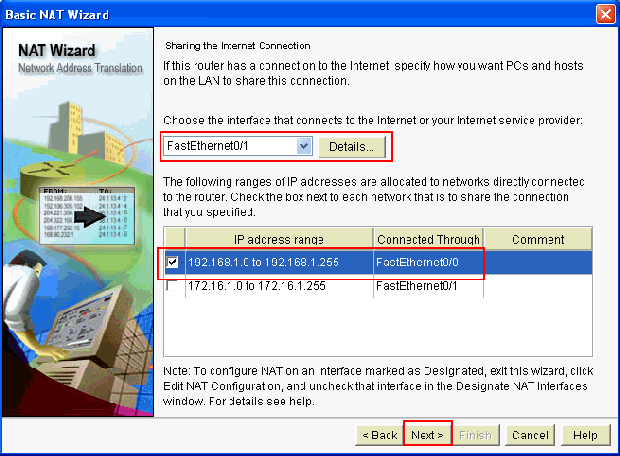
- Choose the interface that connects to the Internet or your
ISP and choose the IP address range to which Internet access is to be
shared. After choosing this information, click Next as shown here:

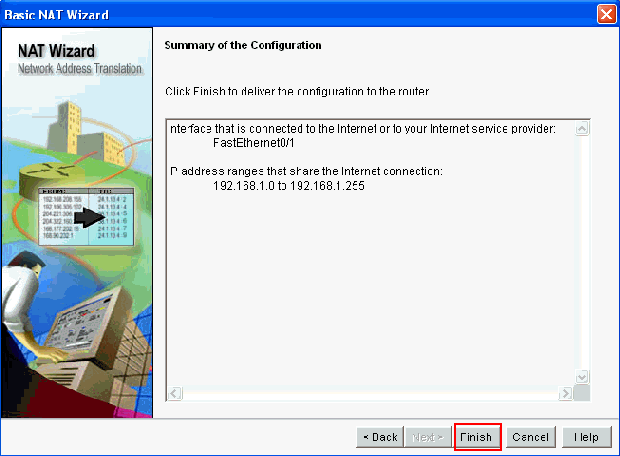
- This window appears and shows the configuration summary configured by the user. Click Finish.

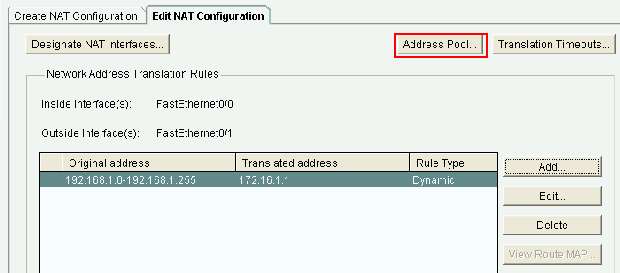
- The Edit NAT Configuration window shows the configured
dynamic NAT configuration with the translated IP address overloaded
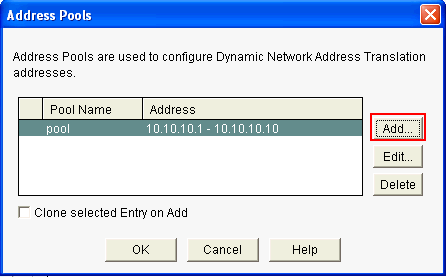
(PATing). If you want to configure the dynamic NATing with address pool,
click Address Pool.

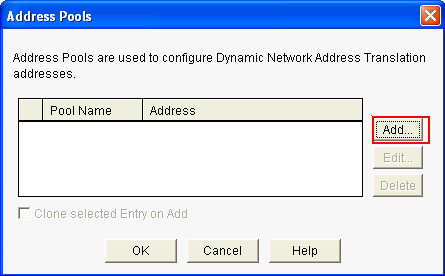
- Click Add.

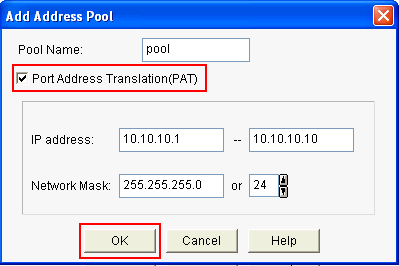
Here,
information such as the pool name and IP address range with netmask are
provided. There can be times when most of the addresses in the pool
have been assigned, and the IP address pool is nearly depleted. When
this occurs, PAT can be used with a single IP address in order to
satisfy additional requests for IP addresses. Check Port Address Translation (PAT) if you want the router to use PAT when the address pool is close to depletion. Click OK.

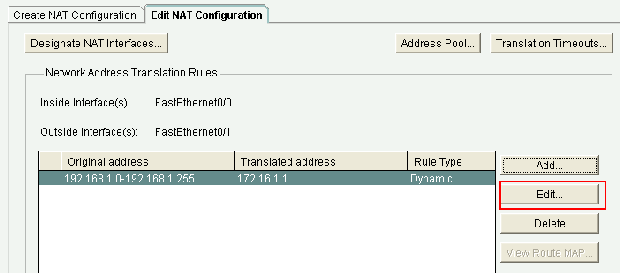
- Click Add.

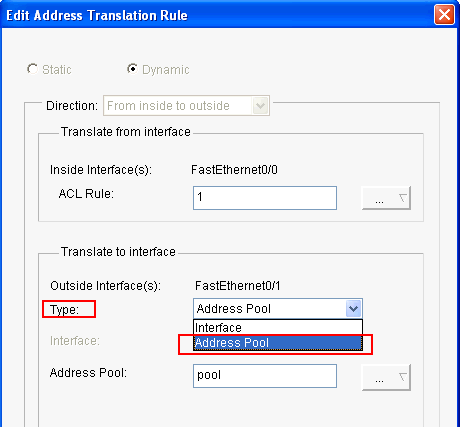
- Click Edit.

- Choose Address Pool in the Type field, provide the name to the Address Pool as pool, and click OK.

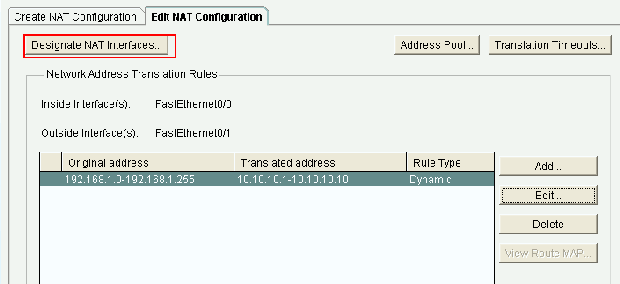
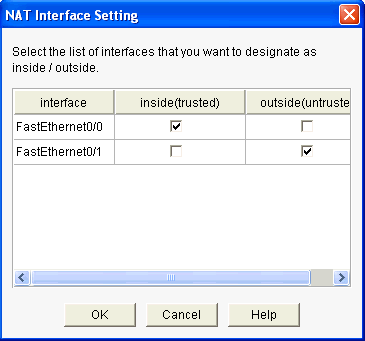
- This window shows the configuration for dynamic NATing with the address pool. Click Designate NAT Interfaces.

Use
this window in order to designate the inside and outside interfaces
that you want to use in NAT translations. NAT uses the inside and
outside designations when it interprets translation rules, because
translations are performed from inside to outside, or from outside to
inside.
Once designated, these interfaces are used in all NAT
translation rules. The designated interfaces appear above the
Translation Rules list in the main NAT window.

Perform these steps in order to configure static NAT in a Cisco router:
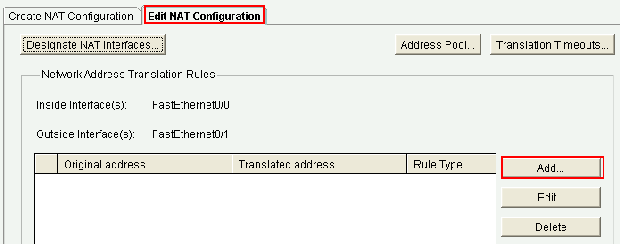
- Choose Configure > Router > NAT > Edit NAT Configuration and click Add in order to configure static NATing.

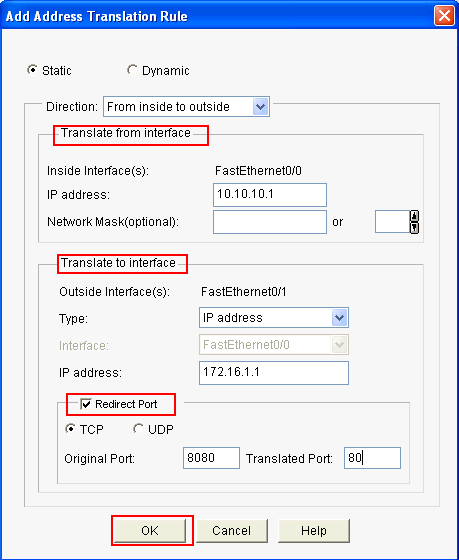
- Choose the Direction either from inside to outside or from outside to inside, and specify the inside IP address to be translated under Translate from Interface. For the Translate to Interface area, choose the Type:
- Choose IP Address if you want the Translate from Address to be translated to an IP address defined in the IP Address field.
- Choose Interface if you want the Translate from Address to use the address of an interface on the router. The Translate from Address is translated to the IP address assigned to the interface that you specify in the Interface field.
Check Redirect Port if you want to include port
information for the inside device in the translation. This enables you
to use the same public IP address for multiple devices, as long as the
port specified for each device is different. You must create an entry
for each port mapping for this Translated to address. Click TCP if this is a TCP port number and click UDP
if it is a UDP port number. In the Original Port field, enter the port
number on the inside device. In the Translated Port field, enter the
port number that the router is to use for this translation. Refer to the
Allowing the Internet to Access Internal Devices section of Configuring Network Address Translation: Getting Started.

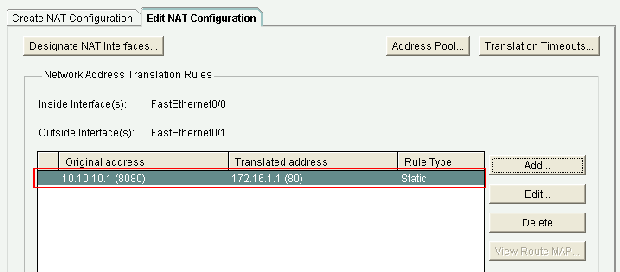
This window shows the static NATing configuration with port redirection enabled:

Perform these steps in order to configure static routing in a Cisco router:
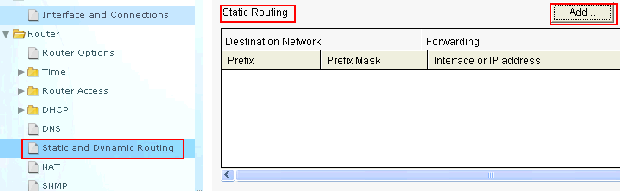
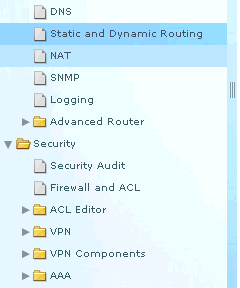
- Choose Configure > Router > Static and Dynamic Routing and click Add in order to configure static routing.

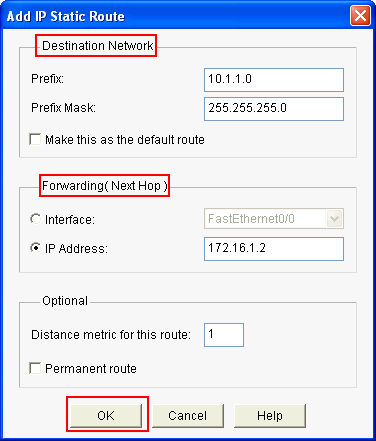
- Enter the Destination Network address with mask and choose either outgoing interface or next hop IP address.

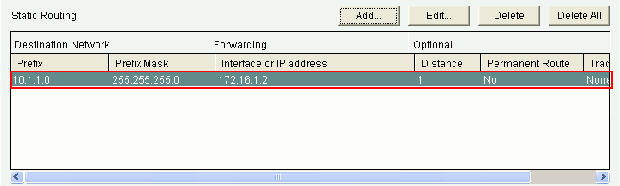
This window shows the static route configured for the 10.1.1.0 network with 172.16.1.2 as the next hop IP address:

Perform these steps in order to configure the dynamic routing in a Cisco router:
- Choose Configure > Router > Static and Dynamic Routing.
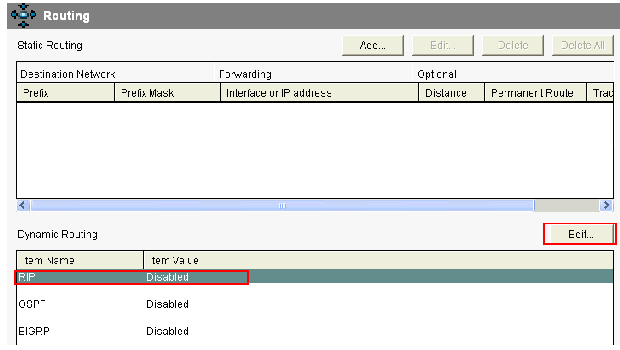
- Select the RIP and click Edit.

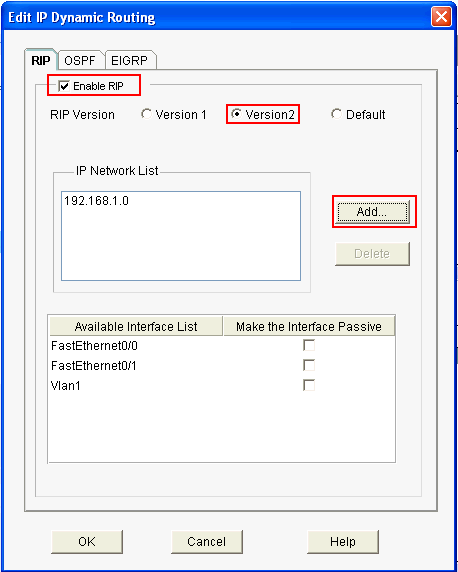
- Check Enable RIP, choose the RIP version, and click Add.

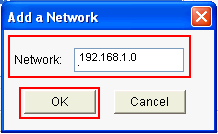
- Specify the Network address to be advertised.

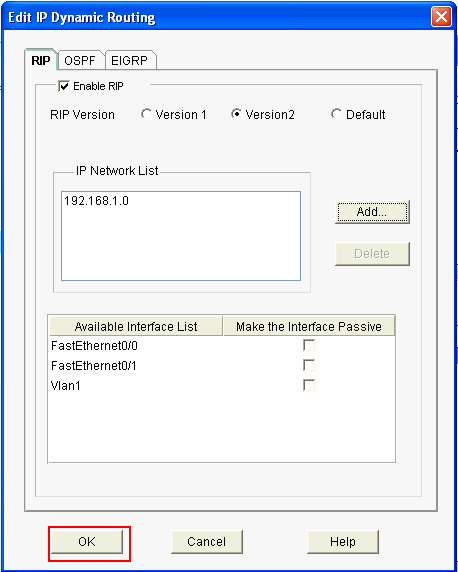
- Click OK.

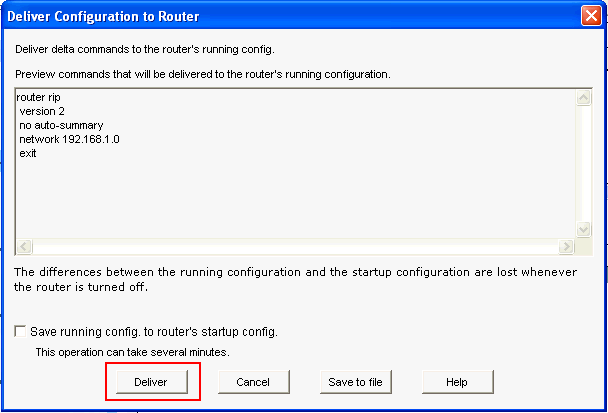
- Click Deliver in order to transfer the commands to the router.

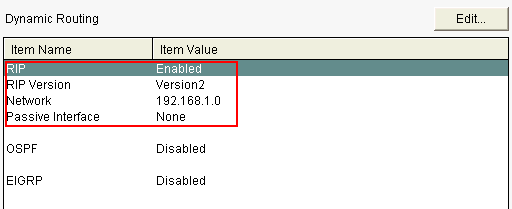
This window shows the dynamic RIP routing configuration:


Perform these steps in order to configure the other basic settings in a Cisco router:
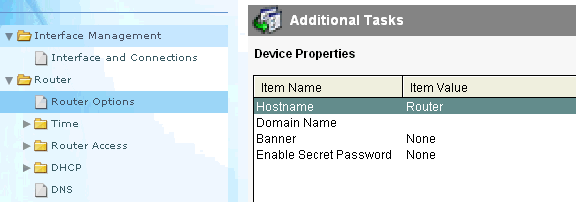
- Choose Configure > Router > Router Options and click Edit if you want to change the Hostname, Domain Name, Banner, and Enable Secret Password properties for a router.

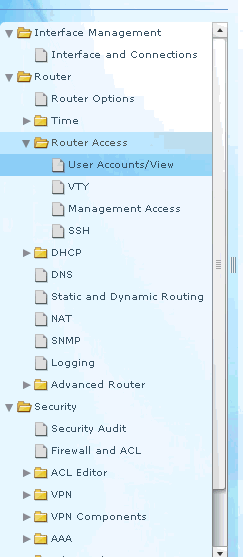
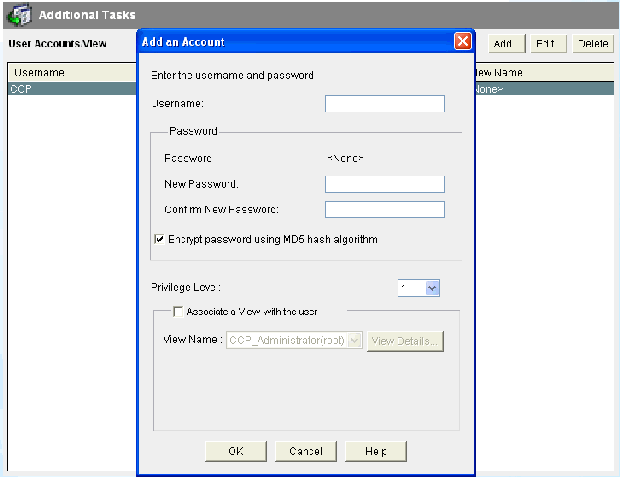
- Choose Configure > Router Access > User Accounts/View in order to add/edit/delete the User Accounts to the router.


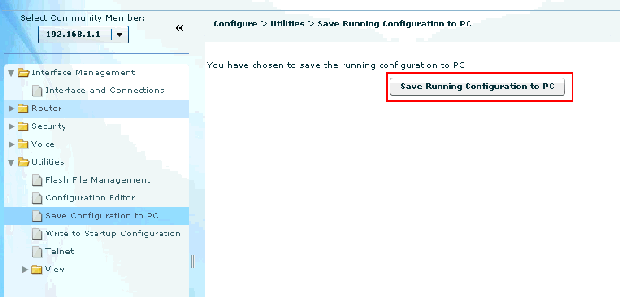
- Choose Configure > Utilities > Save Running Config to PC
in order to save the configuration to the NVRAM of the router as well
as the PC and to reset the current configuration to default (factory)
settings.
Note: In order to use CCP to restore the
configuration file stored on a computer to a router or to backup the
configuration file from a router to a computer, access the Configuration
Editor, and click I agree. In the Configure window, choose Import configuration from PC, and then click the replace running configuration button.

| Router Configuration |
Router#show run
Building configuration...

Current configuration : 2525 bytes

!

version 12.4
service timestamps debug datetime msec
service timestamps log datetime msec
no service password-encryption

!

hostname Router

!

boot-start-marker
boot-end-marker

!

no logging buffered
enable password cisco

!

no aaa new-model

!

resource policy

! ! !

ip cef

! ! !


!--- RSA certificate generated after you enable the !--- ip http secure-server command.

crypto pki trustpoint TP-self-signed-2401602417
 enrollment selfsigned
 subject-name cn=IOS-Self-Signed-Certificate-2401602417
 revocation-check none
 rsakeypair TP-self-signed-2401602417

crypto pki certificate chain TP-self-signed-2401602417
 certificate self-signed 01
  30820248 308201B1 A0030201 02020101 300D0609 2A864886 F70D0101 04050030
  31312F30 2D060355 04031326 494F532D 53656C66 2D536967 6E65642D 43657274
  69666963 6174652D 32343031 36303234 3137301E 170D3130 30353139 30393031
  31315A17 0D323030 31303130 30303030 305A3031 312F302D 06035504 03132649
  4F532D53 656C662D 5369676E 65642D43 65727469 66696361 74652D32 34303136
  30323431 3730819F 300D0609 2A864886 F70D0101 01050003 818D0030 81890281
  8100CD35 A3A6E322 9B6005DA A0FF26C2 8A0DC5AF 27B38F3B DBF2BF58 D8F2655D
  31115681 EC8BC750 03FE3A25 0F79DC74 3A839496 CB9486F1 A1F5BF43 D92BA7AF
  3C72A57B D8D37799 50493588 A5A18F7F 27955AB0 AC36B560 3BE9F648 A4F6F41F
  B9E9C5E6 F9570DEB 5555FDED 9593BD00 5ABB30CD D3B9BDFA F570F987 651652CE
  3D310203 010001A3 70306E30 0F060355 1D130101 FF040530 030101FF 301B0603
  551D1104 14301282 10526F75 7465722E 70616D6D 692E636F 6D301F06 03551D23
  04183016 80146A0A C2100122 EFDA58AB C319820D 98256622 52C5301D 0603551D
  0E041604 146A0AC2 100122EF DA58ABC3 19820D98 25662252 C5300D06 092A8648
  86F70D01 01040500 03818100 83B0EC8C 6916178F 587E15D6 5485A043 E7BB258D
  0C9A63F2 DA18793D CACC026E BC0B9B33 F8A27B34 5BD7DD7F FCECA34F 04662AEC
  07FD7677 A90A8D1C 49042963 C2562FEC 4EFFF17C 360BF88A FEDC7CAA AE308F6C
  A5756C4A F574F5F3 39CE14AE BAAEC655 D5920DD0 DA76E296 B246E36E 16CFBC5A
  00974370 170BBDAD C1594013
   quit


! ! ! ! ! ! ! ! !--- Create a user account named ccpccp with all privileges.

username ccpccp privilege 15 password 0 cisco123
archive
 log config
  hidekeys


! ! ! ! ! ! !--- The LAN interface configured with a private IP address.

interface FastEthernet0/0
 description $ETH-LAN$
 ip address 192.168.1.1 255.255.255.0


!--- Designate that traffic that originates from behind !--- the interface is subject to Network Address Translation (NAT).

 ip nat inside
 ip virtual-reassembly
 duplex auto
 speed auto


! !--- This is the LAN interface configured with a routable (public) IP address.

interface FastEthernet0/1
 description $ETH-WAN$
 ip address 172.16.1.1 255.255.255.0

!--- Designate that this interface is the !--- destination for traffic that has undergone NAT.

ip nat outside
 ip virtual-reassembly
duplex auto
 speed auto


! ! !--- RIP version 2 routing is enabled.

router rip
 version 2
 network 192.168.1.0
 no auto-summary

!--- This is where the commands to enable HTTP and HTTPS are configured.

ip http server
ip http authentication local
ip http secure-server


! !--- This configuration is for dynamic NAT. !


!--- Define a pool of outside IP addresses for NAT.

ip nat pool pool 10.10.10.1 10.10.10.100 netmask 255.255.255.0

!--- In order to enable NAT of the inside source address, !--- specify that traffic from hosts that match access list 1 !--- are NATed to the address pool named pool1.

ip nat inside source list 1 pool pool1


! !--- Access list 1 permits only 122.168.1.0 network to be NATed.

access-list 1 remark CCP_ACL Category=2
access-list 1 permit 192.168.1.0 0.0.0.255


! !--- This configuration is for static NAT !--- In order to translate the packets between the real IP address 10.10.10.1 with TCP !--- port 80 and the mapped IP address 172.16.1.1 with TCP port 500. !

ip nat outside source static tcp 10.10.10.1 8080 172.16.1.1 80 extendable

! !


! ! !--- The default route is configured and points to 172.16.1.2.

ip route 0.0.0.0 0.0.0.0 172.16.1.2

! ! ! !

control-plane

! ! ! ! ! ! ! ! ! !

line con 0
line aux 0

!--- Telnet enabled with password as cisco.

line vty 0 4
 password cisco
 transport input all
line vty 5 15
 password cisco
 transport input all

! ! !

end
|
Choose
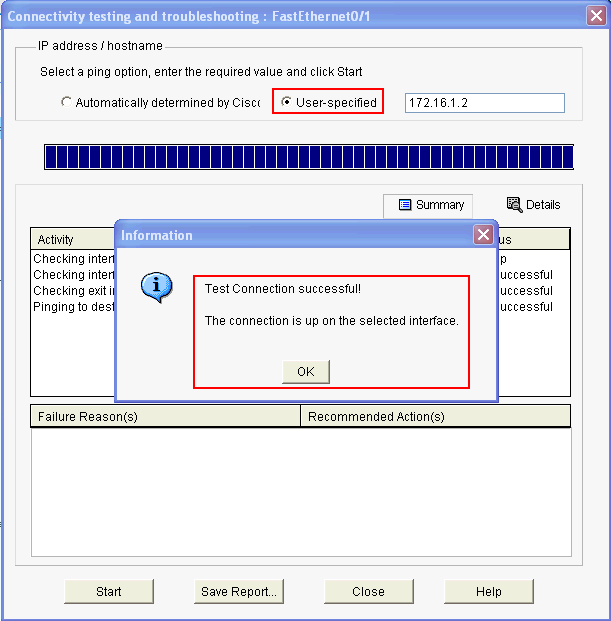
Configure > Interface & Connections > Edit Interface Connections > Test Connection in order to test the end-to-end connectivity. You can specify the remote end IP address if you click the
User-specified radio button.

The
Output Interpreter Tool (
registered customers only) (OIT) supports certain
show commands. Use the OIT to view an analysis of
show command output.
Note: Refer to
Important Information on Debug Commands before you issue debug commands.
You can use these options in order to troubleshoot:
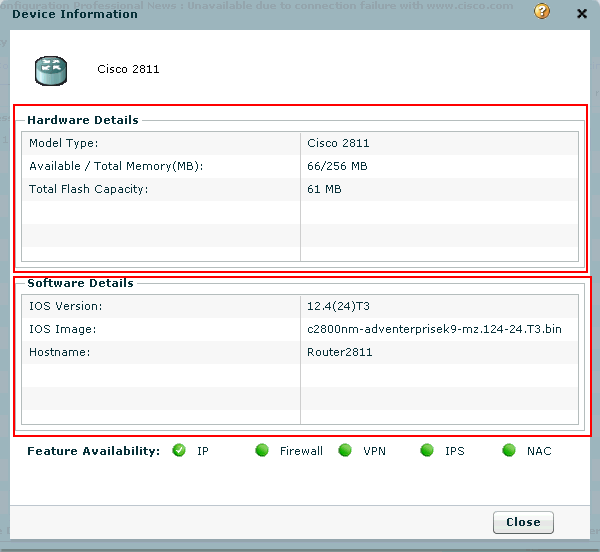
- Choose Help > About this Router in order to view the hardware and software details of the router.

- The Help option provides information about the various available options in the Cisco CP for the configuration of routers.

You can change the router user name and password through Cisco CP.
Complete these steps in order to change the user name and password:
- Create a new temporary user account, and then log in to the temporary user account.
- Change the user name and password of the main user account
(that is, the user account of the router on which you want to change the
user name and password) in your Cisco CP.
- Log out from the temporary account, and log in to the main user account.
- Delete the temporary user account after you change the password for the main account.
Problem
You might receive this internal error when you use Internet Explorer 8 to configure the 2800 series router using Cisco CP:
Internal error: [FaultEvent fault=[RPC Fault faultString="Send
failed" faultCode="Client.Error.MessageSend"
faultDetail="Channel.Connect.Failed error NetConnection.Call.Failed:
HTTP: Status 200: url: 'http://localhost:8600/messagebroker/amf'"]
messageId="A08846FF-E7C6-F578-7C38-61C6E94899C7" type="fault"
bubbles=false cancelable=true eventPhase=2]
Downgrading Java does not resolve the issue.
Solution
This error might be the result of a browser compatibility issue.
Internet Explorer 8 changes many fundamental aspects of developing
applications for IE. Cisco recommends that you downgrade Internet
Explorer to version 7. You should also uninstall and reinstall Cisco CP.
Problem
When you download the application setup file and attempt to install Cisco CP, you might receive this error:
Unable to read the source file. File could be Corrupted.
Please re-install Cisco Configuration Professional to resolve the issue
Solution
Try the following in order to resolve this.
- Delete all instances of Cisco CP on your PC, and perform a fresh download and install.
- If the previous step does not work, try to download a different version of Cisco CP.
- If the previous step does not work, contact Cisco TAC.
Note: You must have valid Cisco user credentials in order to contact Cisco TAC.
Click
Start > Programs > Cisco Systems > Cisco Configuration Professional > Collect Data for Tech Support. Cisco CP automatically archives the logs in a zip file named
_ccptech.zip. Perform a local file system search for this file if it is not saved to your Desktop. You can send these technical logs to
Cisco TAC for further troubleshooting.
Note: Close all instances of Cisco CP to get rid of any other issues in archiving the logs.
Problem
Once Cisco CP is launched and the community is configured,
discovery of the router takes more time than usual. Here are the Cisco
CP logs that describe the time elapsed:
July 10, 2009 8:29:19 AM EDT Discovering device test-router
July 10, 2009 8:29:20 AM EDT Last discovery clean-up elapsed time was 47 milliseconds.
July 10, 2009 8:31:13 AM EDT Discovery job allocation elapsed time was 113859 milliseconds.
July 10, 2009 8:31:13 AM EDT Authentication completed.
July 10, 2009 8:40:28 AM EDT Video feature disabled. Video feature discovery elapsed time=214375 ms
July 10, 2009 8:51:15 AM EDT Security feature ready - elapsed time was 860734 milliseconds.
July 10, 2009 8:51:16 AM EDT Total device test-router discovery elapsed time was 1316047 milliseconds.
This issue occurs with all routers irrespective of their model and
platform. In addition, there are no memory or CPU related issues on the
routers.
Solution
Verify the authentication mode. If authentication does not occur
locally, then check if there is an issue with the authenticating server.
Fix any issue with the authenticating server in order to resolve this
issue.