Saturday, February 4, 2017
Signs of a Bad Computer Fan
With so much going on inside a computer case,
computer fans are a vital component in ensuring the machine continues
to function well. Components heat up quickly inside a computer tower,
and a series of fans and assorted other cooling devices are the only
things keeping the machine from overheating and eventually
malfunctioning. When a fan becomes faulty, it often exhibits signs that
make it clear to the user that something is wrong.
Computer fans can become faulty, endangering the machine they're designed to keep cool.
With
so much going on inside a computer case, computer fans are a vital
component in ensuring the machine continues to function well. Components
heat up quickly inside a computer tower, and a series of fans and
assorted other cooling devices are the only things keeping the machine
from overheating and eventually malfunctioning. When a fan becomes
faulty, it often exhibits signs that make it clear to the user that
something is wrong.
Computer fans can become faulty, endangering the machine they're designed to keep cool.
Computer
fans are designed to run quietly in the background, allowing them to
complete their tasks without providing much of a disturbance to the
user. When a fan becomes faulty, it will occasionally begin operating
more loudly, either with a rattling sound or an audible hum. These
sounds don't necessarily mean that the fan is failing. It is possibly
the sound of something that has become lodged in the fan or that the fan
has come loose. Taking the computer to a professional is the best
course of action the moment a fan becomes noisier. It is also important
to note that fans are usually designed to function with more intensity
when a computer starts up or shuts down. More audible sounds from the
fans are expected in these instances.
A
fan's primary role is to ensure that a computer's components don't
overheat during use, which could result in permanent damage to the
machine. When a fan breaks down, the computer's performance often serves
as the most telling sign. Overheating computers exhibit several
symptoms, the most common of which is a loss of function through
repeated freezes or lockups. Other signs include general protection
failure messages and a malfunctioning hard drive that eventually leads
to the "blue screen of death," the term given to an error message
signaling a major hardware failure. If the user opens the computer case
and these problems subside, overheating is the most likely problem and
the faulty fan requires replacement.
Certain
newer computers are equipped with systems that can detect a
malfunctioning fan before it reaches the point of sounding like a jet
engine. These computers give out warning messages like "CPU 1 fan
failure" or "Power supply fan failure," along with a notification that
the computer will shut down if the problem is not dealt with in one
minute. These messages are triggered by the failure of the fans
themselves, so a user will know right away if the devices are faulty. In
this case, taking the machine to a professional is the best decision
unless the user knows how to safely and effectively replace the fans
himself.
This is what a 5MB hard drive looked like in 1956
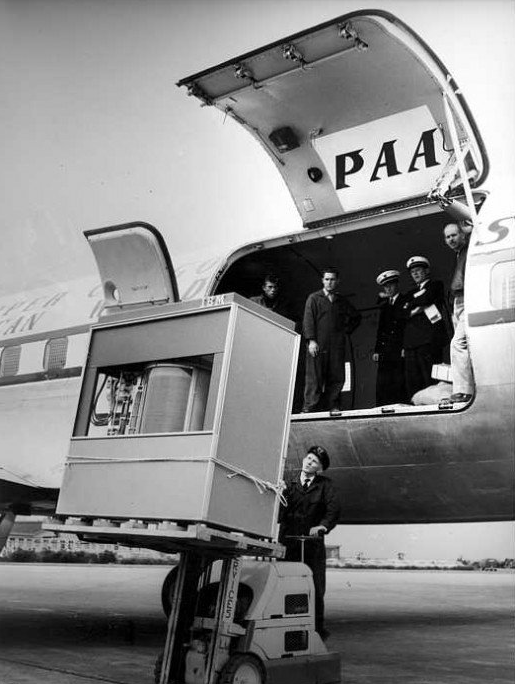
Its a hard disk in 1956....
The Volume and Size of 5MB memory storage in 1956.
In September 1956 IBM launched the 305 RAMAC, the first computer with a hard disk drive (HDD). The HDD weighed over a ton and stored 5MB of data.
Makes you appreciate your 4 GB USB drive, doesn't it?
Origins: When mid-20th century prognosticators tried to imagine what life would be like in the
In 1956, IBM introduced the
It started with a product announcement in May of 1955. IBM Corp. was
introducing a product that offered unprecedented random-access storage — 5 million characters (not bytes, they were 7-bit, not 8-bit
characters). This first disk drive heralded startling leaps in
mass-storage technology and the end of sequential storage on punched
cards and paper or Mylar tape, though magnetic tape would continue for
archival or backup storage.
The disk drive was big, not quite ready for today's laptop. With its vacuum-tube control electronics, the RAMAC (for "random-access method of accounting and control") occupied the space of two refrigerators and weighed a ton. It stored those5 million characters on 50 hefty
aluminum disks coated on both sides with a magnetic iron oxide, a
variation of the paint primer used for the Golden Gate Bridge.
What is pictured above is the IBM 350 disk storage unit utilized by the IBM 305 RAMAC:
The disk drive was big, not quite ready for today's laptop. With its vacuum-tube control electronics, the RAMAC (for "random-access method of accounting and control") occupied the space of two refrigerators and weighed a ton. It stored those
The 350 Disk Storage Unit consisted of the magnetic disk memory unit
with its access mechanism, the electronic and pneumatic controls for the
access mechanism, and a small air compressor. Assembled with covers,
the 350 was 60 inches long, 68 inches high and 29 inches deep. It was configured with 50 magnetic disks containing 50,000 sectors, each of which held 100 alphanumeric characters, for a capacity of 5 million characters.
Disks rotated at 1,200 rpm, tracks (20 to the inch) were recorded at up to100 bits per inch, and typical head-to-disk spacing was 800 microinches.
The execution of a "seek" instruction positioned a read-write head to
the track that contained the desired sector and selected the sector for a
later read or write operation. Seek time averaged about 600 milliseconds.
With storage capacities of 5 million and 10 million digits, and the capability to be installed either singly or in pairs, the 350 provided the305 system with storage capacities of 5, 10, 15 or 20 million characters.
An IBM RAMAC 305 with a 350 disk storage unit leased for about $3,200 per month back in 1957. Over a thousand of the Disks rotated at 1,200 rpm, tracks (20 to the inch) were recorded at up to
With storage capacities of 5 million and 10 million digits, and the capability to be installed either singly or in pairs, the 350 provided the
Full Form Of C.O.M.P.U.T.E.R & types of processor
lonethoughts
Computer' is not an acronym, it is a word. The word stems from the verb 'to compute' which means to calculate.
The word is derived from the Latin 'computare', which is composed of com- 'together' +putare 'to settle' (an account).
There is a myth that the word computer stands for 'Common Operating Machine Purposely Used for Technological and Educational Research'.
This is utter rubbish; for a start, the 'definition' does not make sense, and secondly, when computers where invented and named, they did exactly what their name suggests - they were gigantic calculators. They were rare and expensive devices that filled entire rooms.
That such a machine would have been named 'common' would have been ridiculous, let alone the idea that someone would use one for fun, or anything other than technological and educational research.
In 1943, Thomas Watson, the chairman of IBM, said that he thought there was "a world market for maybe five computers". This was, bear in mind, the man in charge of a computer company; and he was in change of making them sound good. It makes me wonder what else will change and become commonplace by the time he reaches his old age.
Computer Processor Types
A few years ago, choosing a processor was pretty straightforward. AMD and Intel each produced two series of processors, a mainstream line and a budget line. Each company used only one processor socket, and there was a limited range of processor speeds available. If you wanted an Intel processor, you might have a dozen mainstream models and a half-dozen budget models to choose among. The same was true of AMD.OEM Versus Retail-BoxedNowadays, choosing a processor isn't as simple. AMD and Intel now make literally scores of different processor models. Each company now offers several lines of processors, which differ in clock speed, L2 cache, socket type, host-bus speed, special features supported, and other characteristics. Even the model names are confusing. AMD, for example, has offered at least five different processor models under the same name Athlon 64 3200+. An Intel Celeron model number that ends in J fits Socket 775, and the same model number without the J designates the same processor for Socket 478. A Pentium 4 processor model number that ends in J says nothing about the socket type it is designed for, but indicates that the processor supports the execute-disable bit feature. And so on.
To further confuse matters, most AMD and Intel processors are available in two types of packaging, called OEM and retail-boxed. OEM processor packages include only the bare processor and usually provide only a 90-day warranty. Retail-boxed processors include the processor, a compatible CPU cooler, and a longer warranty, typically three years.
A retail-boxed processor is usually the better deal. It typically costs only a few dollars more than the OEM version of the same processor, and the bundled CPU cooler is usually worth more than the price difference. But if you plan to install an after-market CPU cooler for example, because you are upgrading your system to be as quiet as possible it may make sense to buy the OEM processor.
AMD and Intel each offer the three categories of processors described in the following sections.
Budget processors
Budget processors give up a bit of performance in exchange for a lower price. At any given time, AMD or Intel's fastest available budget processor is likely to have about 85% of the performance of their slowest mainstream model. Budget processors are more than sufficient for routine computing tasks. (After all, today's budget processor was yesterday's mainstream processor and last week's performance processor.) Budget processors are often the best choice for a system upgrade, because their lower clock speeds and power consumption make it more likely that they'll be compatible with an older motherboard.AMD Sempron
The various models of the AMD Sempron processor sell in the $50 to $125 range, and are targeted at the budget through low-end mainstream segment. The Sempron replaced the discontinued Socket A Duron processor in 2004, and the obsolescent Socket A Athlon XP processor in 2005. Various Sempron models are available in the obsolescent Socket A and in the same Socket 754 used by some Athlon 64 models.AMD actually packages two different processors under the Sempron name. A Socket A Sempron, also called a K7 Sempron, is in fact a re-badged Athlon XP processor. A Socket 754 Sempron, shown in Figure 5-1 is also called a K8 Sempron, and is really a cut-down Athlon 64 model running at a lower clock speed with a smaller L2 cache and a single-channel memory controller rather than the dual-channel memory controller of the Athlon 64. Early Sempron models had no support for 64-bit processing. Recent Sempron models include 64-bit support, although the practicality of running 64bit software on a Sempron is questionable. Still, like the Athlon 64, the Sempron also runs 32-bit software very efficiently, so you can think of the 64-bit support as future-proofing.
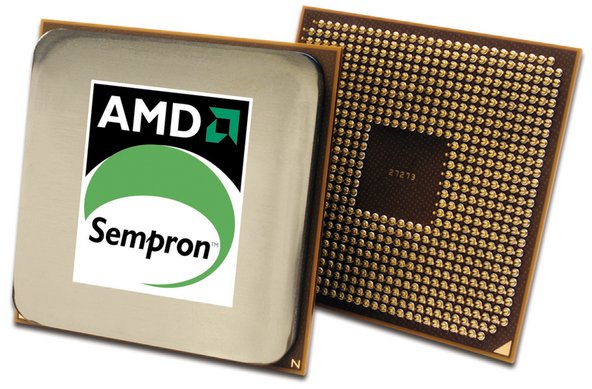 Figure 5-1: AMD Sempron processor (image courtesy of AMD, Inc.)
For more information about Sempron processor models, visit http://www.amd.com/sempron.
Intel Celeron
For many years, the Intel Celeron processor was the poor stepsister, offering too little performance at too high a price. Cynical observers believed that the only reason Intel sold any Celeron processors at all was that system makers wanted the Intel name on their boxes without having to pay the higher price for an Intel mainstream processor.That all changed when Intel introduced their Celeron D models, which are now available for Socket 478 and Socket 775 motherboards. While Celeron D models are still slower than Semprons dollar-for-dollar, the disparity is nowhere near as large as in years past. Celeron D processors, which sell in the $60 to $125 range, are very credible upgrade processors for anyone who owns a Socket 478 or Socket 775 motherboard. Like the Sempron, Celeron models are available with 64-bit support, although again the practicality of running 64-bit software on an entry-level processor is questionable. Once again, it's important to verify the compatibility of your motherboard with the specific Celeron you intend to install, and you may need to upgrade the BIOS to recognize the Celeron.
AVOID NON-D CELERON PROCESSORSFor more information about Celeron processor models, visit http://www.intel.com/celeron.
Celeron processors (without the "D") are based on the Northwood core and have only 128 KB of L2 cache. These processors have very poor performance, and unfortunately remain available for sale. The Celeron D models are based on the Prescott-core, and have 256 KB of L2 cache.
Mainstream processors
Mainstream processors typically cost $125 to $250 although the fastest models sell for $500 or more and offer anything up to about twice the overall performance of the slowest budget processors. A mainstream processor may be a good upgrade choice if you need more performance than a budget processor offers and are willing to pay the additional cost.However, depending on your motherboard, a mainstream processor may not be an option even if you are willing to pay the extra cost. Mainstream processors consume considerably more power than most budget processors, often too much to be used on older motherboards. Also, mainstream processors often use more recent cores, larger L2 caches, and other features that may or may not be compatible with an older motherboard. An older power supply may not provide enough power for a current mainstream processor, and the new processor may require faster memory than is currently installed. If you intend to upgrade to a mainstream processor, carefully verify compatibility of the processor, motherboard, power supply, and memory before you buy the processor.
AMD Athlon 64
The AMD Athlon 64 processor, shown in Figure 5-2, is available in Socket 754 and Socket 939 variants. As its name indicates, the Athlon 64 supports 64-bit software, although only a tiny percentage of Athlon 64 owners run 64-bit software. Fortunately, the Athlon 64 is equally at home running the 32-bit operating systems and applications software that most of us use.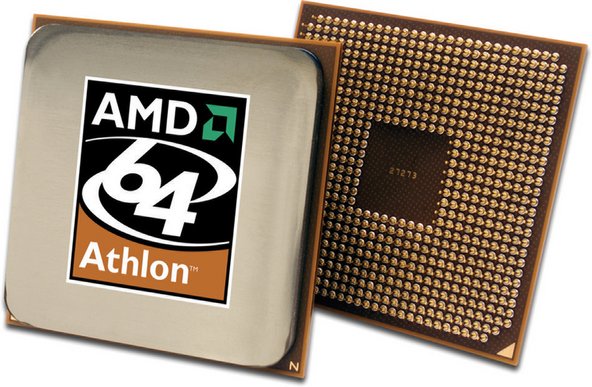 Figure 5-2: AMD Athlon 64 processor (image courtesy of AMD, Inc.)
NUMBERS LIEFor more information about Athlon 64 processor models, visit http://www.amd.com/athlon64.
The model numbers of Athlon 64 and Sempron processors are scaled differently. For example, the Socket 754 Sempron 3100+ runs at 1800 MHz and has 256 KB of cache, and the Socket 754 Athlon 64 2800+ runs at the same clock speed and has twice as much cache. Despite the lower model number, the Athlon 64 2800+ is somewhat faster than the Sempron 3100+. Although AMD hotly denies it, most industry observers believe that AMD intends Athlon 64 model numbers to be compared with Pentium 4 clock speeds and Sempron model numbers with Celeron clock speeds. Of course, Intel also designates their recent processors by model number rather than clock speed, confusing matters even further.
Intel Pentium 4
The Pentium 4, shown in Figure 5-3, is Intel's flagship processor, and is available in Socket 478 and Socket 775. Unlike AMD which sometimes uses the same Athlon 64 model number to designate four or more different processors with different clock speeds, L2 cache sizes, and sockets Intel uses a numbering scheme that identifies each model unambiguously.Older Pentium 4 models, which are available only in Socket 478, are identified by clock speed and sometimes a supplemental letter to indicate FSB speed and/or core type. For example, a Socket 478 Northwood-core Pentium 4 processor operating at a core speed of 2.8 GHz with the 400 MHz FSB is designated a Pentium 4/2.8. The same processor with the 533 MHz FSB is designated a Pentium 4/2.8B, and with the 800 MHz FSB it's designated a Pentium 4/2.8C. A 2.8 GHz Prescott-core Pentium 4 processor is designated a Pentium 4/2.8E.
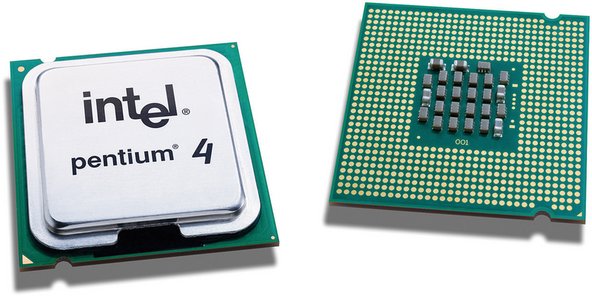 Figure 5-3: Intel Pentium 4 600 series processor (image courtesy of Intel Corporation)
For more information about Pentium 4 processor models, visit http://www.intel.com/pentium4.
Extreme Processors
We classify the fastest, most expensive mainstream processors those that sell in the $400 to $500 range as performance processors, but AMD and Intel reserve that category for their top-of-the-line models, which sell for $800 to $1,200. These processors the AMD Athlon 64 FX, the Intel Pentium 4 Extreme Edition, and the Intel Pentium Extreme Edition are targeted at the gaming and enthusiast market, and offer at best marginally faster performance than the fastest mainstream models.
In fact, the performance bump is generally so small that we think anyone who buys one of these processors has more dollars than sense. If you're considering buying one of these outrageously expensive processors, do yourself a favor. Buy a $400 or $500 high-end mainstream processor instead, and use part of the extra money for more memory, a better video card, a better display, better speakers, or some other component that will actually provide a noticeable benefit. Either that, or keep the extra money in the bank.
Dual-core processors
By early 2005, AMD and Intel had both pushed their processor cores to about the fastest possible speeds, and it had become clear that the only practical way to increase processor performance significantly was to use two processors. Although it's possible to build systems with two physical processors, doing that introduces many complexities, not least a doubling of the already-high power consumption and heat production. AMD, later followed by Intel, chose to go dual-core.Combining two cores in one processor isn't exactly the same thing as doubling the speed of one processor. For one thing, there is overhead involved in managing the two cores that doesn't exist for a single processor. Also, in a single-tasking environment, a program thread runs no faster on a dual-core processor than it would on a single-core processor, so doubling the number of cores by no means doubles application performance. But in a multitasking environment, where many programs and their threads are competing for processor time, the availability of a second processor core means that one thread can run on one core while a second thread runs on the second core.
The upshot is that a dual-core processor typically provides 25% to 75% higher performance than a similar single-core processor if you multitask heavily. Dual-core performance for a single application is essentially unchanged unless the application is designed to support threading, which many processor-intensive applications are. (For example, a web browser uses threading to keep the user interface responsive even when it's performing a network operation.) Even if you were running only unthreaded applications, though, you'd see some performance benefit from a dual-core processor. This is true because an operating system, such as Windows XP, that supports dual-core processors automatically allocates different processes to each core.
AMD Athlon 64 X2
The AMD Athlon 64 X2, shown in Figure 5-4, has several things going for it, including high performance, relatively low power requirements and heat production, and compatibility with most existing Socket 939 motherboards. Alas, while Intel has priced its least expensive dual-core processors in the sub-$250 range, the least expensive AMD dual-core models initially sold in the $800 range, which is out of the question for most upgraders. Fortunately, by late 2005 AMD had begun to ship more reasonably priced dual-core models, although availability is limited.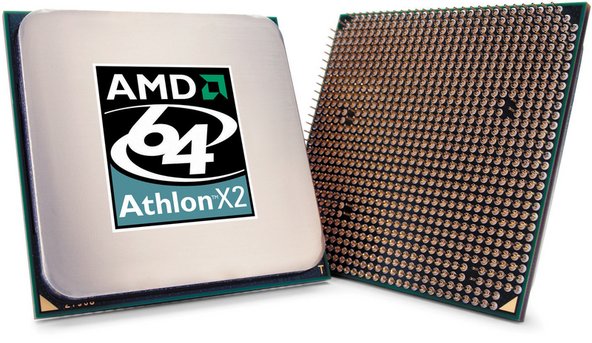 Figure 5-4: AMD Athlon 64 X2 processor (image courtesy of AMD, Inc.)
Intel Pentium D
The announcement of AMD's Athlon 64 X2 dual-core processor caught Intel unprepared. Under the gun, Intel took a cruder approach to making a dual-core processor. Rather than build an integrated dual-core processor as AMD had with its Athlon 64 X2 processors, Intel essentially slapped two slower Pentium 4 cores on one substrate and called it the Pentium D dual-core processor.The 800-series 90 nm Smithfield-core Pentium D, shown in Figure 5-5, is a stop-gap kludge for Intel, designed to counter the AMD Athlon 64 X2 until Intel can bring to market its real answer, the dual-core 65 nm Presler-core processor, which is likely to be designated the 900-series Pentium D. The Presler-based dual-core processors will be fully integrated, compatible with existing dual-core Intel-compatible motherboards, and feature reduced power consumption, lower heat output, twice as much L2 cache, and considerably higher performance.
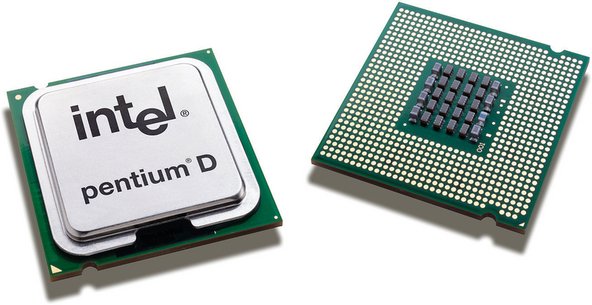 Figure 5-5: Intel Pentium D dual-core processor (image courtesy of Intel Corporation)
For more information about Pentium D processor models, visit http://www.intel.com/products/processor/....
AMD and Intel processor summaries
Table 5-2 lists the important characteristics of current AMD processors, including the special features they support.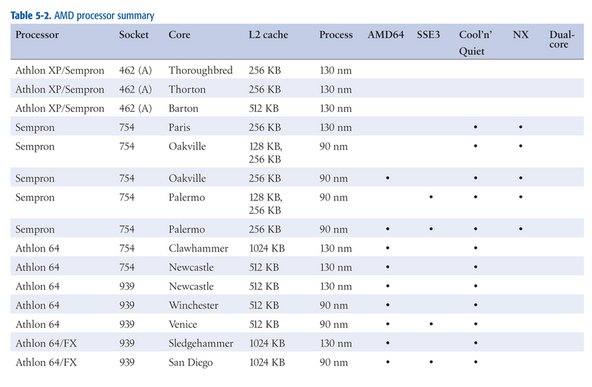 Table 5-2: Table 5-2. AMD processor summary
 Table 5-3: Intel processor summary
SPECIAL FEATURES
Special features are not always implemented across an entire line of processors. For example, we list the Pentium D 8XX-series processors as supporting EM64T, SSE3, EIST, and dual core. At the time we wrote this, three Pentium D 8XX models were available: the 2.8 GHz 820, the 3.0 GHz 830, and the 3.2 GHz 840. The 830 and 840 models support all of the special features listed. The 820 model supports EM64T, SSE3, and dual-core operation, but not EIST. If a special feature listed as being supported by a particular line of processors is important to you, verify that it is supported in the exact processor model you intend to buy.
Saturday, January 28, 2017
HOW TO USE YOUR ANDROID PHONE AS CCTV CAMERA
Go to the play store and type ip camera
and they can appear many application but you need to install two application only
1.Ip webcam
2.Home security ip cam
and they can appear many application but you need to install two application only
1.Ip webcam
2.Home security ip cam
Tuesday, January 24, 2017
Create and Insert a Screen Shot into Word or PowerPoint
By pressing PRINT SCREEN button on your keyboard, you
capture an image of your entire screen, also known as a "screen shot"
or "screen capture", and it is copied to the Clipboard in your
computer's memory. You can then paste the image into a document, e-mail
message, or other file. If you want, you can print the image from the
application that you pasted it into.
You may be asking where the Print Screen button is on your keyboard. On notebook keyboards: look for a button to the right, above the F keys. On external keyboards: it may be above the arrow keys, near the Delete and Page Up buttons. The text you see on your keyboard might be PrtSc, PrtScn, or PrntScrn. The other text on the Print Screen key is usually SysRq.
Copy only the image of the active window
The active window is the window that you are currently working in. Only one window can be active at a time.- Click the window that you want to copy
- Press ALT+PRINT SCREEN
- The text you see on your keyboard might be PrtSc, PrtScn, or PrntScrn The other text on the Print Screen key is usually SysRq
- Paste (CTRL+V) the image into a Microsoft Office program or other application
Copy the entire image on the screen
- Open everything you want copy and position it the way you want
- Press PRINT SCREEN
- The text you see on your keyboard might be PrtSc, PrtScn, or PrntScrn The other text on the Print Screen key is usually SysRq
- Paste (CTRL+V) the image into a Microsoft Office program or other application
You can also Microsoft Paint (Start, All Programs, Accessories, Paint) to crop the image, or save it as a JPEG file.
Use Paint to crop your capture image and save as JPEG
- Capture the screen
- Click on the Start button, slide up to All Programs, then slide up to Accessories, and finally slide over and down to Paint
- Press Ctrl + V to paste in the picture Note: If you want just a portion of the image you can use the Select tool to grab just a portion of the screen
- Click the Freeform Select tool. Then click the Select tool again. Use the Select Tool to select what you need
- Press Ctrl + X to cut what you need
- From the File menu choose New
- Click No when asked to Save
- Press Ctrl + V to paste in the new picture
- You can continue to edit this size
- When ready, select and copy and paste into Word (You can also go to the File menu and choose Save As)
- If this picture is for the web, in the Save as type box, choose JPEG
- Add a name and save to your computer
Export PDFs to Microsoft Office formats
Step 1 of 5
Start
Acrobat, and open the PDF file you want to export. If you opened it
recently, select it from the list of recent files in the Acrobat Home
screen. Otherwise, click My Computer under Storage, navigate to the PDF file, and choose Open.
If you’re using our sample assets, select the Summary.pdf file to export to Word, Analysis.pdf file to export to Excel, or Overview.pdf file to export to PowerPoint.
Note: Some PDF files have security settings that prevent exporting and editing. If you created the PDF file, you should be able to change or remove any restrictive security settings.

Click Export PDF in the Tools panel. Then choose a format, and click Export.
- To export to a Word document, click Microsoft Word, and then select either Word Document (.docx format) or Word 97-2003 Document (.doc format).
- To export to an Excel document, click Spreadsheet, and then select either Microsoft Excel Workbook (.xlsx format) or XML Spreadsheet 2003 (.xml format).
- To export to a PowerPoint presentation, click Microsoft PowerPoint.


Can I recover lost data from the internal memory of an Android Smartphone or an Android Tablet?
It is possible to recover lost or deleted files from the internal storage of an Android mobile device assuming the phone or tablet is operational and you can set it in to Debugging mode.
Here's how:
more info here and here.
Further research shows that other Android devices such as LG, HTC, Motorola, Asus, etc… also can be set to use USB Debugging mode so they can be scanned to recover data.
We tested this with Samsung Galaxy S.
 A Super Scan with File Recovery revealed a FAT32 partition with files/folders - photos/videos.

By:@lonethouts
Here's how:
- You need to change the Android settings on the phone or tablet.
Go to: Settings > Applications > Development > USB Debugging, and turn it on. (Options may vary slightly based on device and Android version.) - Connect your phone/tablet to your PC via a USB cable.
Then, on the device, pull down the status bar and select USB connected.
A screen will appear in which you need to select the button which reads
Connect storage to PC.
If you do not see this option, reconnect the USB cable and try again.
Windows will load drivers for the device which may take a minute, after which, it will be detected as Removable memory with an assigned drive letter. - You can now launch Active@ File Recovery software. The storage media will be recognized as another drive on your system which you can scan for lost or deleted files.
NOTE: When recovery is complete, the
device should be safely removed from Windows (Safely Remove Hardware and
Eject Media) and USB Debugging mode should be turned OFF on the phone.
This procedure will work with most devices (Samsung, LG, HTC,
Motorola, Asus, etc. ) running Android versions - 2.x, 3.x, 4.0.x
(Eclair, Froyo, Gingerbread, Honeycomb, Ice Cream Sandwich). UMS (USB
Mass Storage) option is not available in v4.1, 4.2 Jelly Bean.Some References:
How to Enable USB Debugging on Samsung Devices Android versions - Gingerbread, Honey Comb and Jelly Bean (v2.3, v3.x and v4.x, respectively):more info here and here.
Further research shows that other Android devices such as LG, HTC, Motorola, Asus, etc… also can be set to use USB Debugging mode so they can be scanned to recover data.
We tested this with Samsung Galaxy S.
By:@lonethouts
Saturday, January 7, 2017
How to Automatically Shut Down Your Computer at a Specified Time
Do you always forget
to switch off your computer before going to bed, or just forget to look
at the clock while you're working? This article will tell you how to get
your computer to shut down at a time specified by you.
1
Using the Task Scheduler
-
1Open the Task Scheduler. This option is available in Windows 7 and Windows 8. In Windows 7, click Start → Control Panel → System and Security → Administrative Tools → Task Scheduler. In Windows 8, press the ⊞ Win key, type "schedule tasks", and select "Schedule tasks" from the search results.
-
2Click "Create Basic Task". This option is available in the Actions menu on the right side of the window. You will need to give the task a name and description. Name it something easy to remember, such as "Shutdown Timer". Click Next > to continue.
-
3Choose the frequency. Select the "Daily" option on the "Task Trigger" page and click Next >. Choose the time you want your computer to shut down each night. Leave the "Recur ever: X days" setting to "1". Click Next >.
-
4Choose "Start a program". This option will be on the "Action" screen and should be automatically selected. Click the Next > button to proceed.
-
5Enter the location for the shutdown program. When Windows shuts down, it actually runs a shutdown program. In the "Program/script" field, type C:\Windows\System32\shutdown.exe.
- In the "Arguments" filed, type /s. Click Next >.
-
6Review your settings. In the Summary screen, review your settings to make sure that you have selected the correct day. Click the Finish button to save the task. Your computer will now shut down at that specified time each day.[1]
2
Creating a BAT File
-
1Open notepad by going to Start> All Programmes> Accessories> Notepad. Or, you can just type "notepad", without quotes, into the start menu and hit enter.
-
2Copy the following code:
- @echo off
- :W
- if %time%==00:00:00.00 goto :X
- goto :W
- :X
- shutdown.exe /s /f /t 60 /c "Go to bed!!!!!!"
- This constantly checks the time to see if it is midnight and, if it is, it shuts down the computer with the message "Go to bed!!!!"
-
3Change the if %time%== part to a time of your choice. It must be in this format: HH:MM:SS.MS and in 24 hr format otherwise it won't work.
-
4Go to File> Save As.
- Change the "Save as type" box to "All Files"
- Type "timer.bat" into file name and click "Save"
-
5Double click the file. A blank command prompt screen should appear.
-
6Leave this window open while you do your work.
-
7When the time you specified in step 3 comes around, your computer should display a message for one minute, then shut down.
-
8If you wish to abort the shutdown, press the Windows Key (the key with the Microsoft logo on it) + R.
-
9Type "shutdown -a", without quotes into the window that appears and hit Enter. A Command Prompt window should appear, then disappear. A balloon similar to this one should appear.
Tuesday, January 3, 2017
How to flash Samsung Stock/Official ROM via Odin
After rooting with Kingo Android Root...
Your Samsung device may experience following "symptoms":
This tutorial can also be followed to...
- Device status will become "Custom/Modified", instead of "Official";
- Go to Settings > About device > Status > Device Status > Custom
- Boot into download mode and find out system status is Custom
- Cannot receive OTA update.
- How to restore phone status from "Custom/Modified" to "Official"?
- How to receive OTA update after rooting?
This tutorial can also be followed to...
- Restore your firmware when your device is soft-bricked;
- In the event you think your stock ROM is faulty;
- Flash back to a previous version on your Samsung device.
SAMSUNG AND SAMSUNG ONLY. THIS IS A GENERAL GUIDE. NO GUARANTEE ON ANYTHING. DO IT AT YOUR OWN RISK.
FLASHING STOCK ROM VIA ODIN WILL DEFINITELY WIPE YOUR DATA. SO MAKE BACKUP FIRST.
Flash Samsung Stock ROM (Official/Original Firmware) via Odin
Step 1: Download and install device driver software on your computer.
- Visit Samsung official website to find the correspondent driver software.
- Google the driver software of your device. Download and then install it on you computer.
- Download or update Kies, part of which will install or update drivers.
Step 2: Download and extract the Stock ROM (Official/Original Firmware).
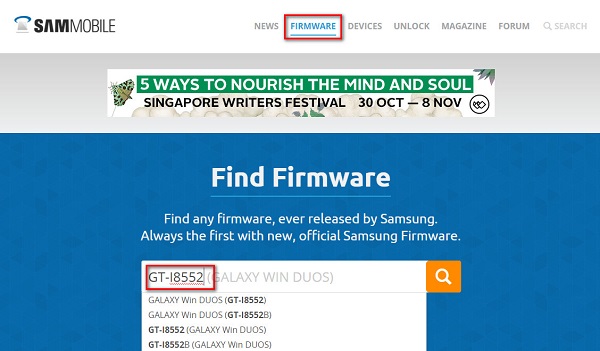
Click "Firmware" and enter your device model
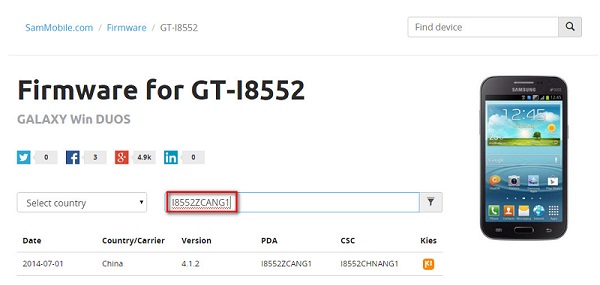
Select country or type in certain info to filter, eg.Baseband version.
After
downloading it (normally a compressed file), you need to extact/unzip
it to certain location of your PC. The file types that Odin uses are
*.bin,*.tar and *.tar.md5.
Find the file you have downloaded and then unzip it to Desktop.

You will find a *.md5 file after extracting.
Step 3: Download and extract Odin on you PC.

Odin v3.10.7 zip file.
After extracting, right-click to "Open as Administrator". It may prevent certain issue from happening.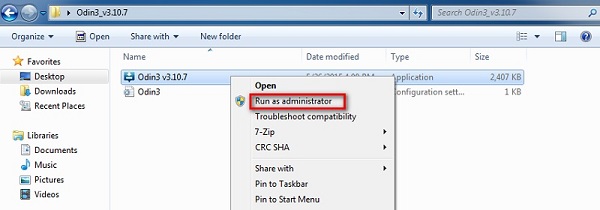
Run Odin as administartor is recommended.
Step 4: Boot your Samsung device into Download mode.
- Power off your device
- Press and hold Volume Down key, Home Key and Power Key
- When your device vibrates, release Power key while keep holding the Volume Down key and Home key
- Press Volume Up key to enter Download mode, which has a green robot figure and “Downloading… Do not turn off target!!)
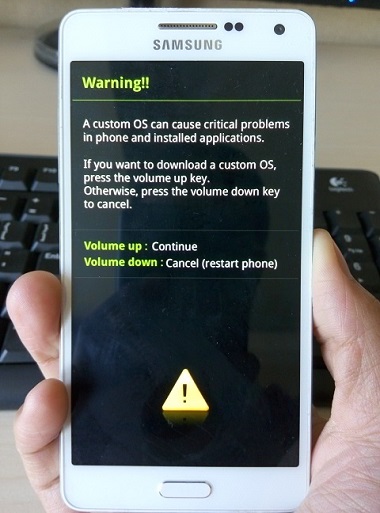
Warning before entering into download mode
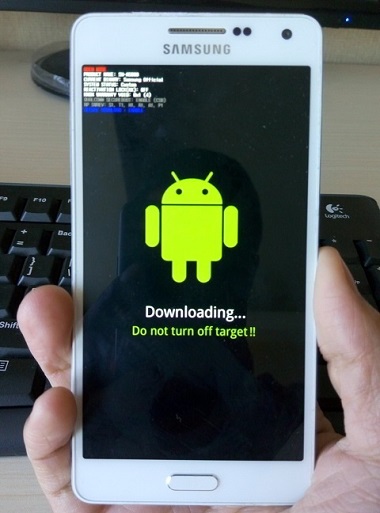
Now you are in download mode.
Step 5: Connect your device to PC.
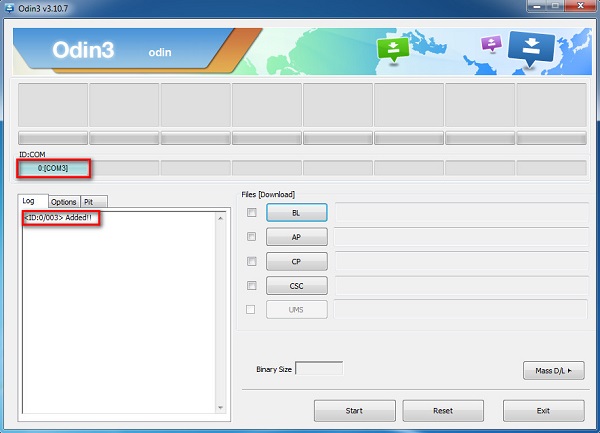
Device is connected to Odin.
Step 6: Click "PDA" or "AP" to add tar.md5 file that you have extracted and then "Start".
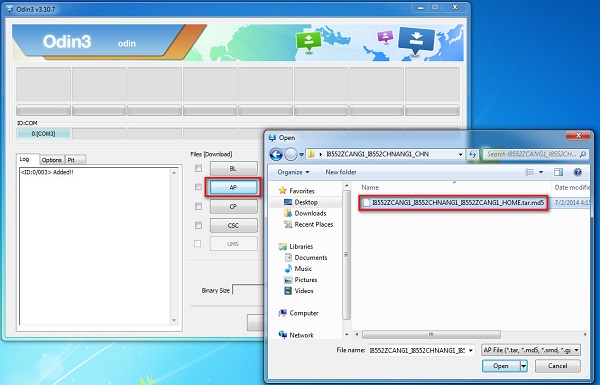
Add *.md5 to Odin.
After adding the file, click "Start" to begin the flashing process.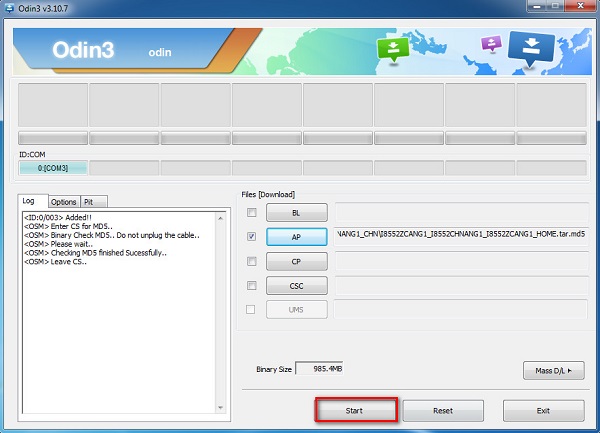
Click "Start" to flash.
WARNING DO NOT REMOVE OR OPERATE ON YOUR DEVICE UNTIL FINISHED OR FAILED IS SHOWED ON ODIN.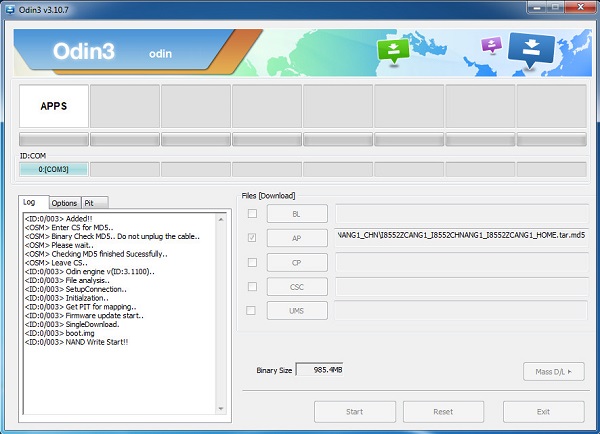
Ongoing flashing process. Do not remove your device.
When
the flashing process is done and if everything goes well, you should
see a big green box saying "RESET" or "PASSED" (depends on the version
of Odin is used). By now, the device should be rebooted and it is safe
to remove/unplug your device.
Flash succeeded.
Top 4 Free Windows 10 Password Recovery/Reset Tool
Forgetting the newly created login password for your Windows 10 computer can be depressing. But there is no need to be too desperate since you can easily get some free Windows 10 password recovery tools here. Each of them can be effective to get your computer accessed. However, some of them have some requirements and incomparable disadvantages. Just figure out your situation and choose the best one to perform.
Top 1: With Created Password Reset Disk
Microsoft allows its users to create a password reset disk at the very beginning of setting the login password. This is Windows 10 password reset disk. Once you forgot Windows 10 password, you can insert this reset disk to reset the login password. It's considered as the best free Windows 10 password reset tool. However, if you haven't created this disk before, skip this method.- Step 1: Insert the reset disk into your Windows 10. After entering the wrong password, the “Reset Password” will appear, click it.
- Step 2: Follow the instruction in “Password Rest Wizard” to reset the forgotten Windows 10 password.
Top 2: With Other Admin Account
If you have shared your Windows 10 with other user who has another admin account, you can enter the PC with this account and recover the forgotten password. However, this option will make you lose any e-mail messages or encrypted files on that account permanently.- Step 1: Open Control Panel after clicking Start button.
- Step 2: Open “User Accounts”, then click User Accounts and Family Safety -> User Accounts.
- Step 3: Click the Manage another account link. All the other users on this computer will be listed.
- Step 4: Select the account whose password you want to recover. Then click “Change the password”.
Top 3: Use Free Windows 10 Password Reset Tool
A free password recovery tool for Windows 10 can easily recover lost or forgotten Windows 10 password. There are so many freeWindows 10 password removal tools on the market. Instead of try them one by one, I recommend Windows Password Key which is trustworthy by many users. It can easily recover Windows 10 administrator password (user password as well) and fully support various brands of desktops, laptops including Dell, HP, IBM, Sony, Lenovo, ASU, etc.After downloading this tool, install and run it on any workable computer. Then get the detailed guide on how to perform this free password recovery tool. Moreover, it can easily crack Microsoft account password.
Top 4: Reinstall Windows 10
Actually reinstallation of Windows 10 must be the last choice for you to crack forgotten Windows 10 password, but it works! If you don't want to try because it will erase the files and folders on your hard drive, skip this and give a new consideration of free downloading Windows password recovery tool.Sum up, there are 3 tools introduced for you to recover Windows 10 password for free. Still, a highly recommended Windows 10 password reset tool is included. Just choose the best for you to crack the forgotten one.
Top 5 Options to Reset Login Password in Windows 8.1
Option 1. Reset Windows 8.1 Login Password in Local Users and Groups.
You must sign in with an administrative privilege and then reset forgotten password for other user account. Local Users and Groups (lusrmgr.msc) is only available in the 8.1 Pro and Enterprise editions. If that doesn't describe your situation, go for versatile Windows Password Key.- 1. Press Windows + R keys to open the Run dialog, type lusrmgr.msc, and click "OK".
- 2. In the left pane, click "Users".
-
3. Right click the local user account that you want to change the password for, and click "Set Password". Then click "Proceed".
- 4. To change your Windows 8.1 logon password: Type in a new password twice, and click "OK".
To remove your Windows 8.1 password: Leave all password fields empty and click "OK".
Option 2. Crack Windows 8.1 password in a Command Prompt
Here is how to hack administrator password using cmd in windows 8.1 to delete. Make sure that you login into as an administrator.- 1. Open Power User Tasks Menus and then elevated command prompt.
-
2. Type the command in the format "net user UserName
NewPassword", press Enter. If you want to remove this password, just
replace NewPassword with *.
- 3. Close the command prompt.
Option 3. To Recover Windows 8.1 Password with Administrator Account in Control Panel
It is required to sign in as an administrator if you need to change other user password for Windows 8.1 in Control Panel.- 1. Open the Power User Tasks Menus and then open Control Panel, and click on "User Account".
-
2. Click "Manage another account".
- 3. If promoted by User Account Control, click "Yes".
- 4. Click on a password protected local user account that you want to recover password in Windows 8.1. Click "Change the password".
- 5. To reset forgotten Windows 8.1 password: Type in a new password twice, type in an optional password hint if you like.
To remove lost Windows 8.1 password: Leave all password and password hint field empty. - 6. Click "Change password".
Option 4. Hack Windows 8.1 Password by Resetting Microsoft Account Password Online
If you use Microsoft account as your Windows 8.1 credentials, you can easily reset your lost Windows 8.1 startup password by following 2 methods.- 1. Directly go to your Microsoft account settings online from any computer: Click on the link https://account.live.com/summarypage.aspx to sign into your Microsoft "Account summary" page.
- 2. If you forgot your Microsoft account password, click "Can't access your account?".
Type your Microsoft account email address and captcha characters. And click "Next".
Select an option for resetting your password: Email me a reset link; Send a code to my phone; I can't use any of these options.
If you can remember Microsoft account password, login into and go to "Account summary" page then click "Change password". - 3. Type in your current Microsoft account password, and type in a new password twice, and click "Save".
Option 5. Reset Windows 8.1 Logon Password with Windows Password Key Disk
Windows Password Key is the most reliable software to easy hack forgotten or lost Windows 8.1 password, as well as lower Windows versions. You can create it at any time you need as soon as you need. It can recover Windows 8.1 administrator password, as well as other standard user account passwords.Follow the short steps. To get started, download this Windows 8.1 password reset tool on another available computer.
-
1. Insert a CD/DVD/USB flash drive on the available computer, and click "Burn" to burn an Asus password reset disk.
-
2. Insert the newly burnt password reset disc to the locked
computer. Set BIOS to boot this computer from CD/DVD/USB. It will reboot
automatically after you finish settings.
-
3. Follow the wizard to reset lost or forgotten Windows 8.1 password.
Additional: How to Reset Login Password in Windows 8.1 when You can Login Windows?
It is a good habit to change Windows 8.1 password on a regular basis to keep your computer secure. Following method is workable to change the current Windows 8.1 password.-
1. Open "PC settings" by pressing Windows + I keys and clicking "Change PC settings". Click "Accounts" on the left side.
- 2. Type in your current password, and click on "Next".
- 3. To change your local user account password: Type in your new password twice, type in a password hint.
To remove your local user account password: Leave all password and password hint field empty. - 4. Click "Next" and then click "Finish".


